

Toolkits for Growers
Seedling Nursery on a Budget
Grow your own transplants. Control your season. Cut your costs.
Who is this for
Home growers ready to stop buying transplants and start producing them, for a balcony, a backyard, or a shared community plot.What you’ll get
A complete home nursery setup, a germination reference, a troubleshooting guide, a seedling calendar, and a microgreens quick-start — all built from working farm practice.SECTION 1
WHY START YOUR OWN — AND WHEN IT PAYS
Buying transplants from a nursery is fast and easy. Growing your own is better — for three reasons that compound across every season you do it.
- Cost: A single tomato transplant costs $4–6 at retail. A packet of 25 seeds costs $3–5 and gives you multiple successions. One season of growing your own pays for the entire setup.
- Timing: The nursery sells transplants when it’s convenient for them — often too late or too early for your specific window. Growing your own means you transplant on the day that fits your schedule.
- Variety control: Garden centers carry 8–12 varieties. Seed companies offer hundreds — including disease-resistant, high-yield, and flavor-forward varieties that never hit retail shelves.
When buying transplants still makes sense: perennials, fruit trees, and specialty herbs (rosemary, established lavender, grafted tomatoes). For annual vegetables and most herbs, grow your own.
SECTION 2
THE BUDGET SETUP
A home nursery needs three things: a reliable light source, consistent warmth, and the right containers. Everything else is optional.
Light
Light is the most critical variable. A sunny windowsill sounds practical — it rarely delivers. Most windows provide 2–4 hours of usable direct light in winter, which produces leggy, weak seedlings that struggle at transplant.
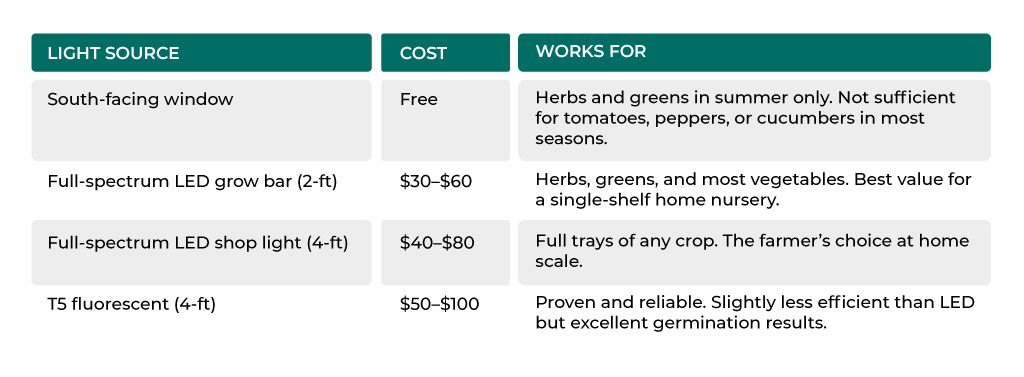
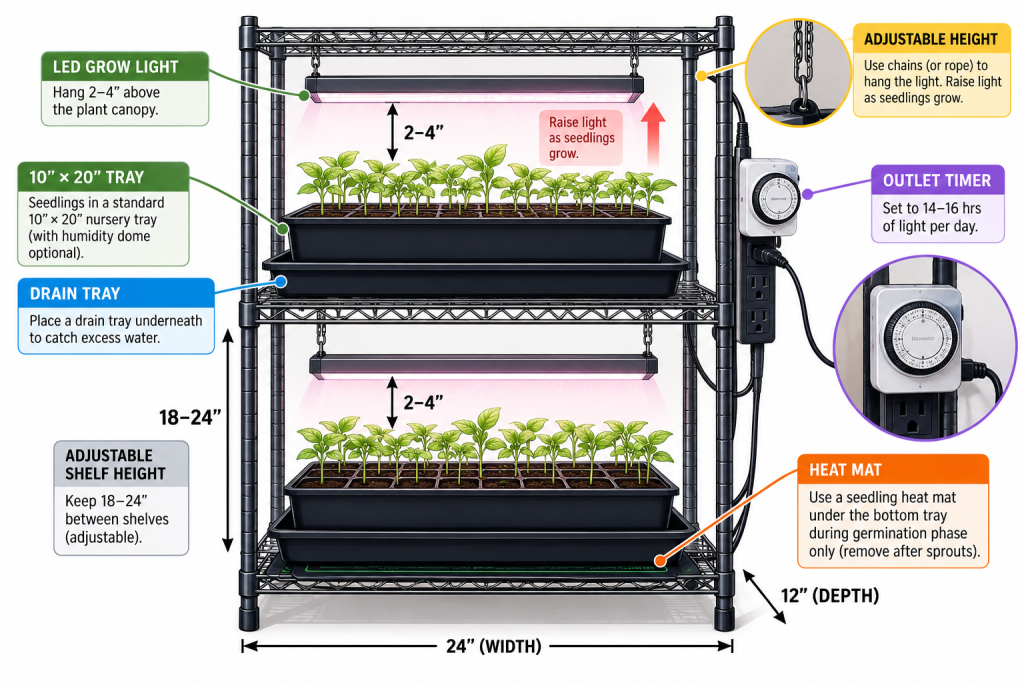
LIGHT DISTANCE: Hang lights 2–4” above the seedling canopy. Too far = leggy. Raise the fixture as seedlings grow, or lower the tray. Set a $10 outlet timer to 14–16 hours per day — manual switching is never consistent enough.
Heat
Seeds germinate by soil temperature, not by light. Most vegetables germinate reliably at 70–85°F. Below 65°F, germination stalls — especially for peppers, tomatoes, basil, and cucumbers.
- A seedling heat mat ($25–$40) placed under the tray during germination is the single cheapest insurance in a home nursery.
- Once seedlings have sprouted, most grow well at normal room temperature (65–75°F). Remove the heat mat.
REGIONAL NOTE: In South Florida and other warm regions, air conditioning can drop indoor temps below the germination threshold for heat-loving crops. Keep trays away from AC vents during the germination phase.
Containers
Cell size determines root volume, and root volume determines transplant quality. Most beginners use cells that are too small.
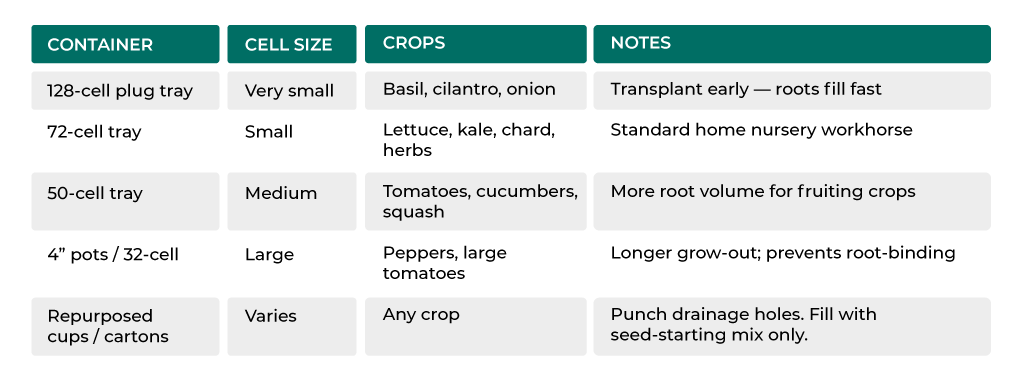
SHELVING: A wire utility rack ($40–$70) with adjustable shelves fits two 10×20” trays per shelf and holds 4–6 trays at once. Add a second shelf and light for two crop cycles simultaneously. See the NFUSA Supply Guide for farmer-vetted nursery equipment at neighborhoodfarmsusa.org/knowledge-hub.
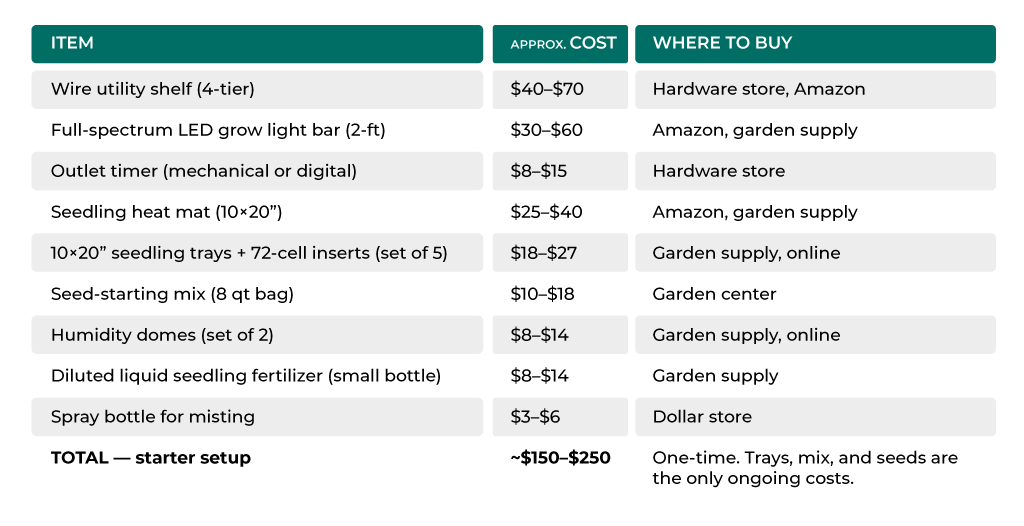
FARMER NOTE: Priority order if budget is tight: light + timer first, heat mat second, everything else after. A single shelf, one light, and a packet of seeds is a functioning home nursery.
SECTION 3
MEDIA + MOISTURE
Seed-Starting Mix — Not Potting Soil
Seed-starting mix and potting mix are not interchangeable. Seed-starting mix is fine, light, and fast-draining — it lets a fragile root hair push through without resistance. Potting mix is denser, holds more moisture, and causes damping off (a fatal fungal collapse at the soil line) in young seedlings.
Standard mix (by volume):
- 50% peat moss or coco coir
- 25% perlite (drainage and aeration)
- 25% vermiculite (moisture buffering)
- Optional: up to 10% worm castings for gentle nutrition
Pre-moisten mix before filling trays. Dry mix repels water and hydrates unevenly. Squeeze a handful — it should hold its shape and feel damp but not drip. If it crumbles, add water. If it drips, it’s too wet.
NEVER USE: Garden soil in cell trays. It compacts, drains poorly, and carries pathogens. Even excellent garden soil produces poor germination results in a cell tray.
Moisture — The Reason Most Home Nurseries Fail
Inconsistent moisture is the number-one killer of home seedlings. The target is evenly moist throughout the cell — not drenched, not drying out between waterings.
Too Wet
Surface stays dark, never lightens
Fungus gnats within days
Seedlings collapse at soil line
Mold on surface
Just Right
Surface lightens slightly between waterings but doesn’t crack
Moist 1” deep on finger test
Seedlings upright, no wilt
Too Dry
Surface is pale and cracking
Seedlings wilt despite recent watering
Germination stalls or is patchy
Bottom Watering — The Farmer Method
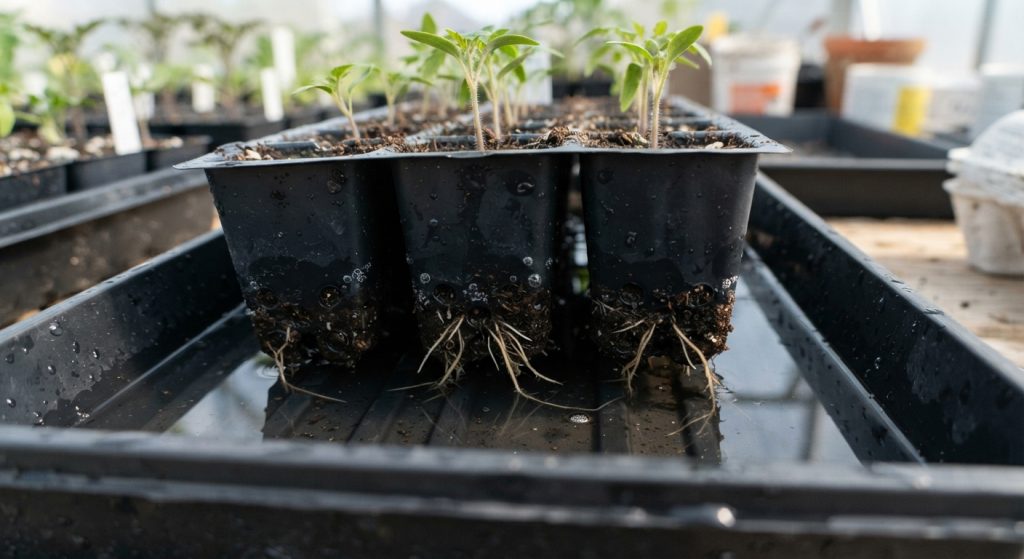
Top watering washes seeds out of cells, disturbs roots, and keeps the surface wet — damping off’s ideal environment. Farmers bottom-water trays.
- Pour ½” of water into the flat drain tray under the cell insert.
- Capillary action pulls moisture evenly upward through the drainage holes. Wait 20–30 minutes, then pour off any water that wasn’t absorbed.
- Top-water only when distributing liquid fertilizer — use a spray bottle, not a stream.
FARMER NOTE: Switching to bottom watering eliminates most damping off. It takes 10 extra seconds per tray and saves entire batches. This is the single most impactful practice change in home nursery management.
SECTION 4
GERMINATION REFERENCE + TROUBLESHOOTING
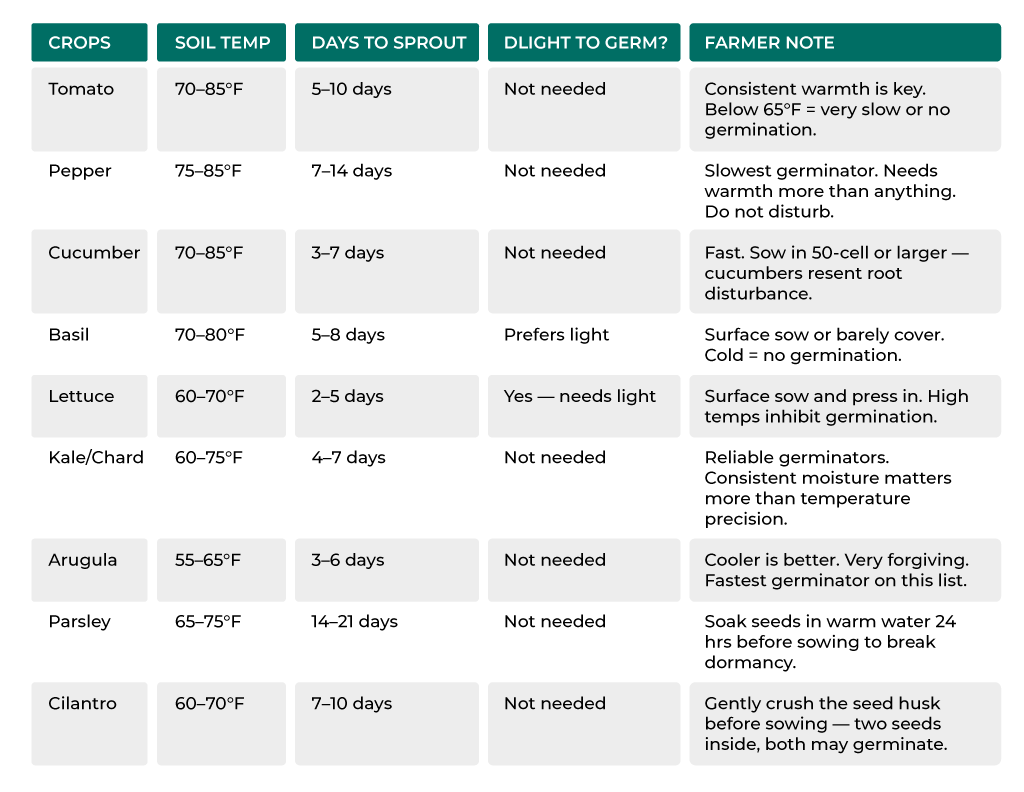
REGIONAL NOTE: In South Florida and Gulf Coast regions, cool-season crops (lettuce, arugula, cilantro) germinate best October through February. Starting them in summer produces poor results even indoors. Match your seedling calendar to the season your crop actually grows in.
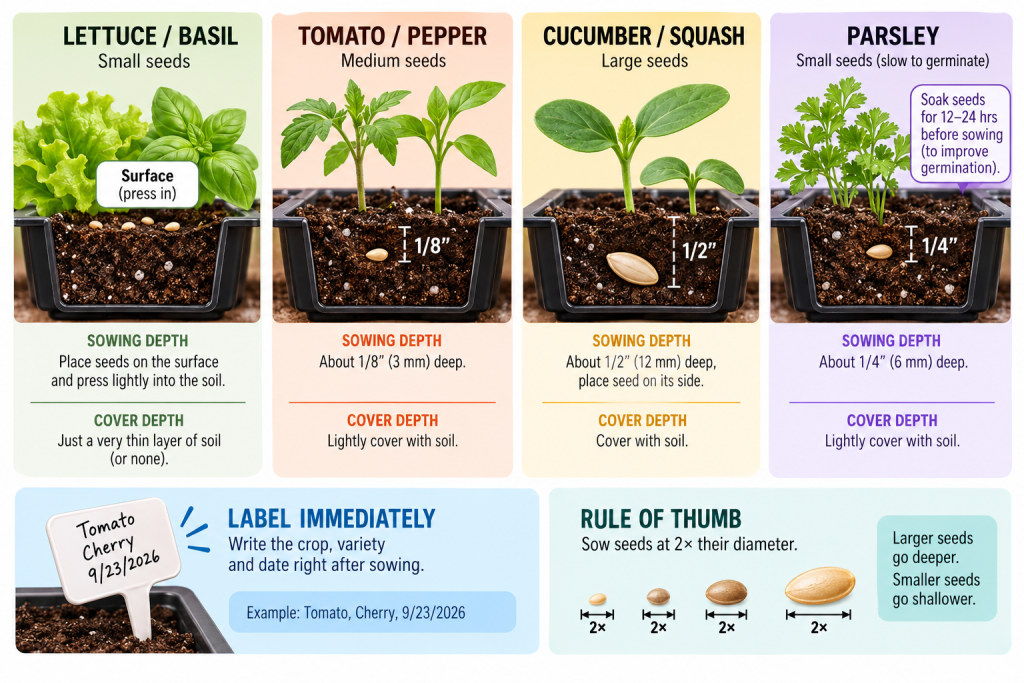
Sowing depth rule of thumb: Sow at 2× the seed’s diameter. Lettuce and basil: surface sow and press gently. Use a pencil or chopstick to make a consistent hole in each cell. Drop 1–2 seeds per cell — if both germinate, thin by snipping (never pulling) the weaker one at soil level. Label every tray immediately: crop, variety, date sown.
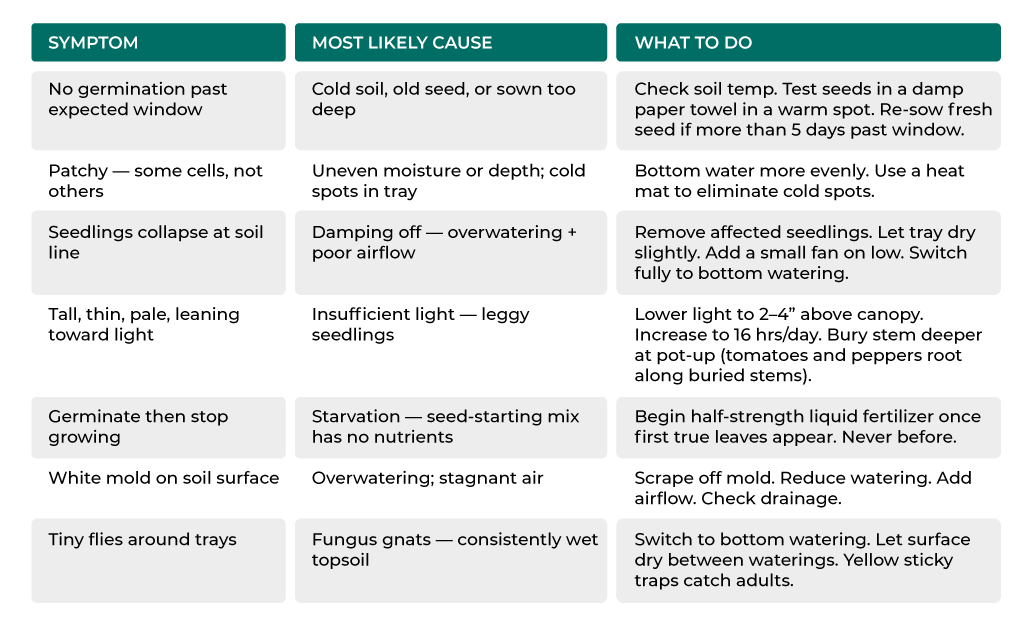
FARMER RULE: When in doubt, re-sow. A week diagnosing a failed tray usually takes longer than starting fresh. Most vegetable seeds are viable 2–5 years when stored sealed and dry.
SECTION 5
POTTING UP + HARDENING OFF
When and How to Pot Up
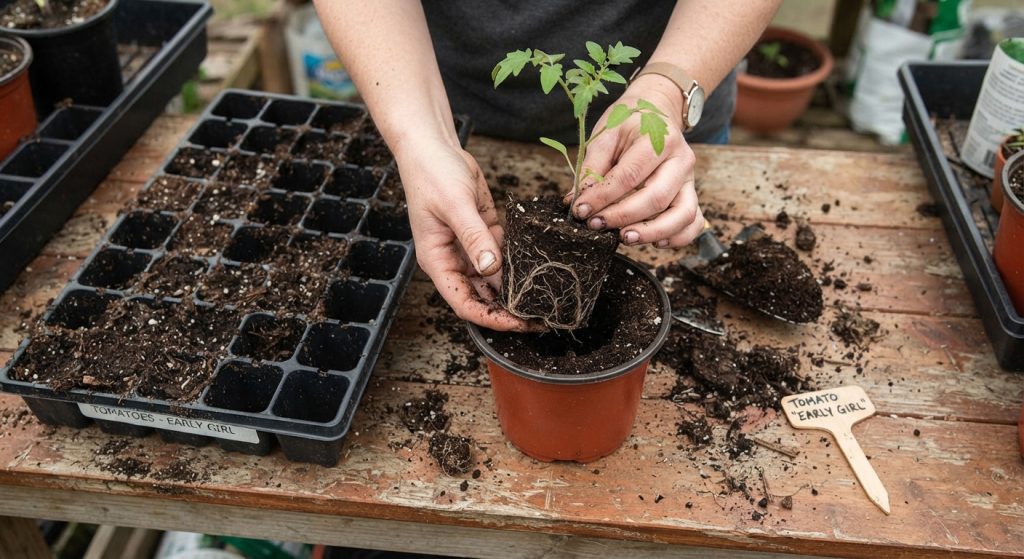
Pot up when roots appear at the drainage hole, or when the seedling has 3–4 true leaves and the cell is visibly cramped. Tomatoes and peppers always need at least one pot-up. Kale, lettuce, and herbs rarely do.
- Water the tray an hour before potting up — moist root balls hold together.
- Fill the new container halfway with moist potting mix (not seed-starting mix — roots need nutrients now).
- Ease the seedling out by pushing up from the drainage hole — never pull from the stem.
- Tomatoes: bury the stem up to the first set of true leaves. They root along the entire buried stem.
- Water in gently and return to lights. Expect 2–3 days of minor wilt as the plant adjusts.
Hardening Off — The Step Most Growers Skip
Hardening off introduces an indoor seedling gradually to outdoor sun, temperature swings, and wind. Skip it and you lose plants to sunscald or transplant shock within days of going outside.
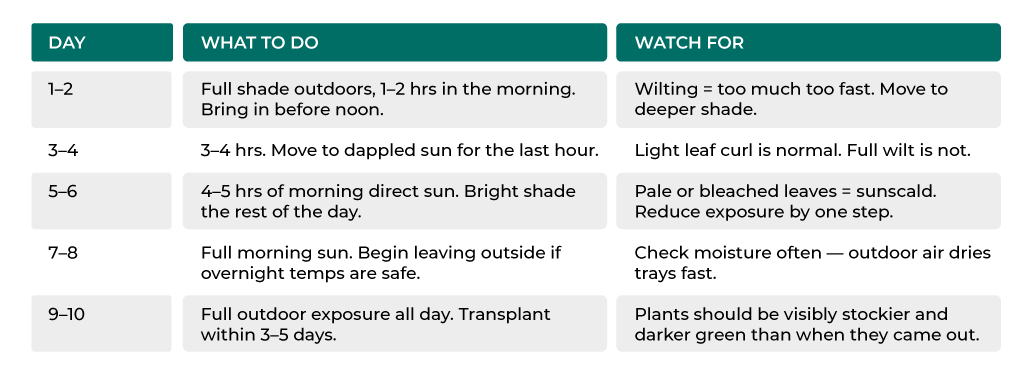
REGIONAL NOTE: In South Florida, the difference between grow-light intensity and full tropical sun is extreme. Even a pleasant 75°F day with full sun can sunscald an indoor-raised seedling. Follow the full 7–10 day hardening schedule regardless of outdoor temperatures. Always start with morning light before 10 AM.
TRANSPLANT DAY: Transplant in the evening or on an overcast day. Water the bed or container the day before — dry soil causes transplant shock. Firm soil around the root ball with your fingers to eliminate air pockets. Water in deeply and immediately. Mulch the base. Shade for 2–3 days if possible — even a folded piece of cardboard on the sunny side dramatically improves survival.
SECTION 6
MICROGREENS — HARVEST IN 7–14 DAYS
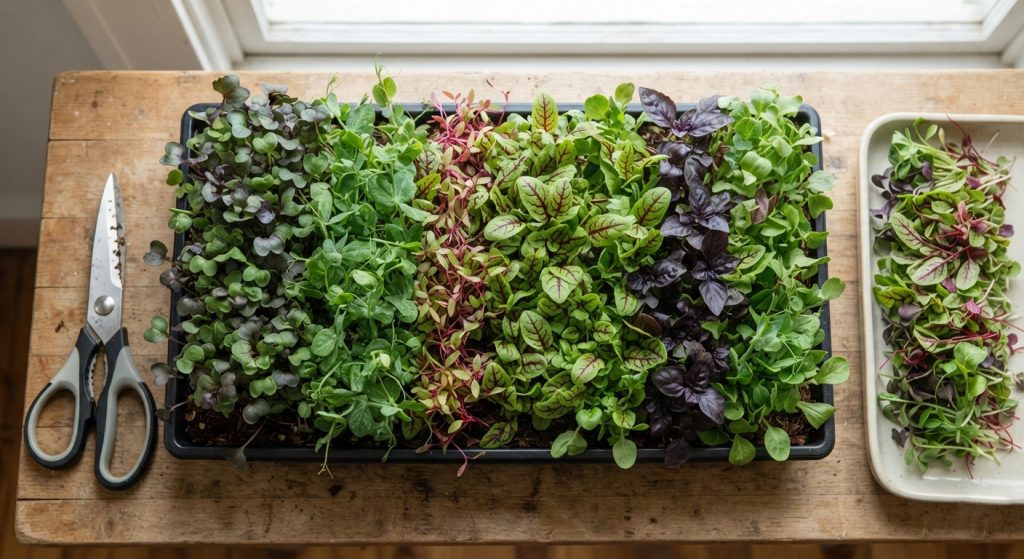
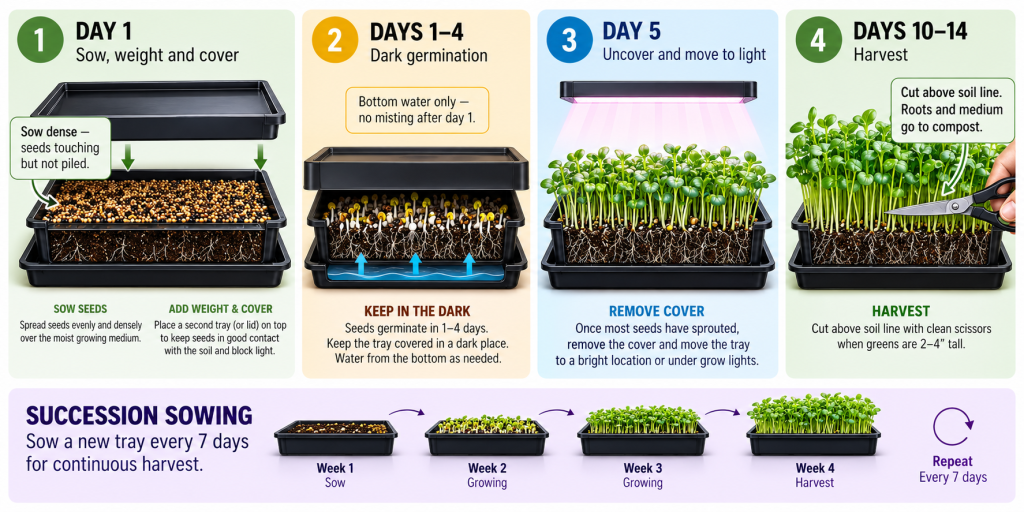
Microgreens are the fastest-return crop in any home nursery. They use the same setup, the same trays, and the same seed-starting mix — and they’re ready to eat while your transplants are still in the nursery. One 10×20” tray produces a full harvest in under two weeks.
What Microgreens Are
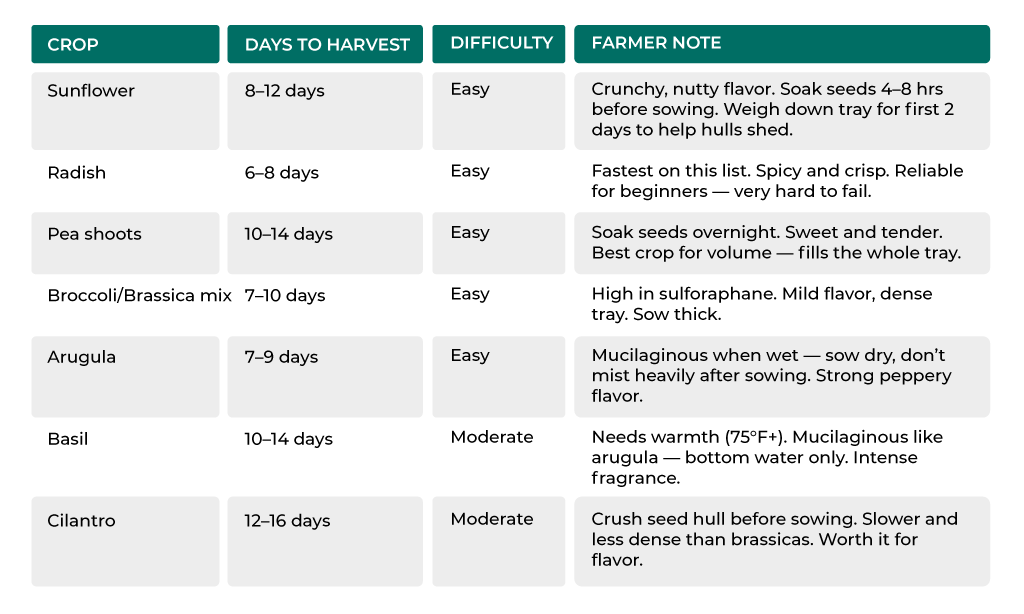
Microgreens are vegetable and herb seedlings harvested at the first true leaf stage — 7 to 14 days after sowing, depending on the crop. They have 4–40× the nutrient concentration of mature vegetables (by weight) and intense flavor. Restaurants pay $25–40/lb for them. You grow them for pennies.
What You Need
- One 10×20” seedling tray (no drainage holes for microgreens) + one with holes nested inside
- Seed-starting mix or coco coir, 1–1.5” deep — no deeper
- Microgreen seeds — sow 10× denser than you would for transplants
- Grow light or a bright south-facing window (microgreens tolerate lower light than transplants)
- A spray bottle and your existing bottom-watering setup
SEED DENSITY: Microgreens are sown thick — the tray should look fully covered after sowing. Underseeding produces sparse, weak greens. Overseeding causes mold from poor airflow. The goal: seeds touching but not piled.
The Microgreen Growing Cycle
- Day 1 — Sow: Pre-moisten mix. Fill tray 1–1.5” deep. Sow seeds densely and evenly. Mist lightly. Place the empty tray on top as a weight and cover with a humidity dome or dark cloth.
- Days 1–4 — Germination: Keep in the dark, at 68–75°F. Bottom-water once if tray feels dry. Stacked tray pressure helps seeds shed their hulls cleanly.
- Day 4–5 — First light: Once shoots are 1–1.5” tall, remove the cover. Move under grow lights or to a bright window. Begin bottom watering once daily.
- Days 5–14 — Grow out: Keep under light 12–16 hrs/day. Bottom water when tray feels light. Do not mist tops — wet canopy causes mold.
- Harvest: Cut with sharp scissors just above the soil line when the first true leaf appears. Rinse, spin dry, store in an airtight container in the refrigerator. Use within 5–7 days.
SUCCESSION SOW: Sow a new tray every 7 days and you’ll have continuous harvests. Two or three trays on rotation gives you microgreens every week all season. Spent trays go straight to compost.
REGIONAL NOTE: In South Florida and warm climates, microgreens grow year-round indoors. In summer, keep the grow space below 80°F — heat accelerates mold. Basil microgreens are one of the few crops that perform better in summer than in winter in a warm-climate nursery.
SECTION 7
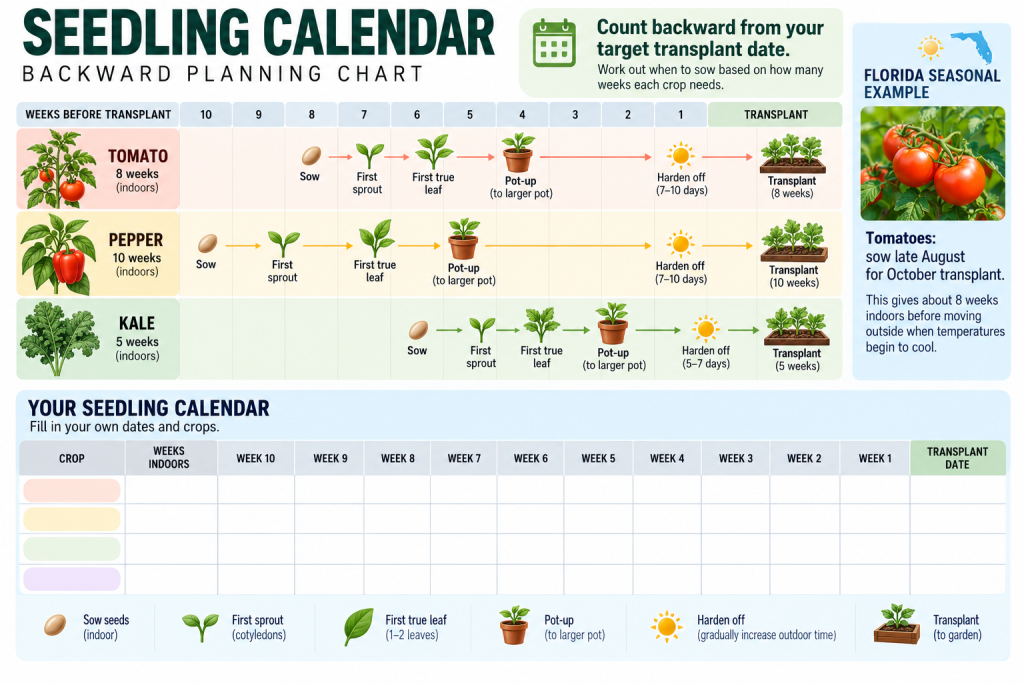
YOUR SEEDLING CALENDAR
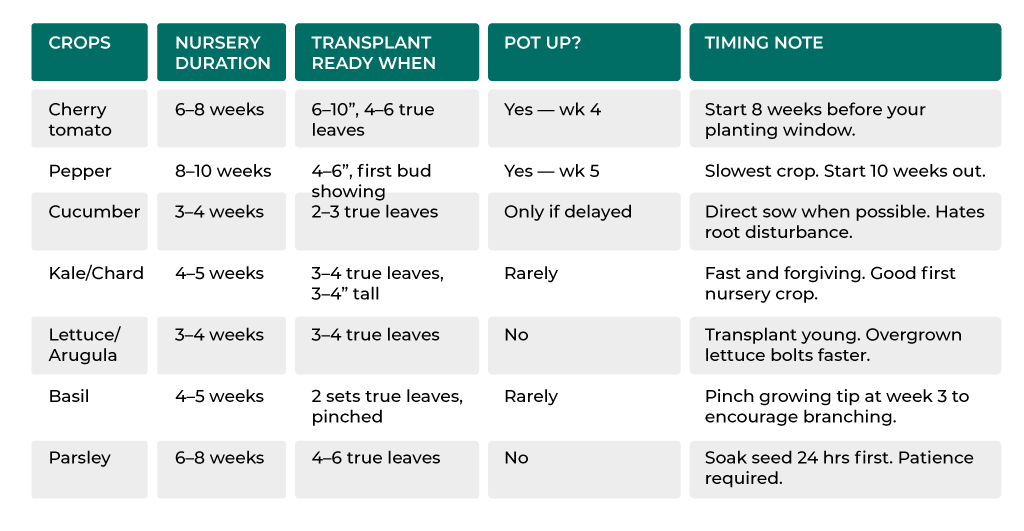
REGIONAL NOTE: Florida windows: Start tomatoes and peppers late August–September for October planting. Start warm-season crops (basil, cucumbers) January–February for March planting. Cool-season crops (kale, lettuce, arugula) transplant best October–January.
SECTION 8
SEEDLING SHARE + MY NURSERY LOG
A single 72-cell tray of tomatoes produces 72 seedlings. A home garden needs 2–4. The rest can be composted, gifted, or shared — and shared seedlings build the kind of neighborhood relationships that make food systems work.
- Split a seed order with 2–3 neighbors. Each person sows a different crop and shares the extras at transplant time.
- “Seedling share day” — a simple gathering where participants bring hardened-off extras and swap. No coordination needed beyond a date and a spot.
- Leave a labeled tray of extras at a community garden, library, or church: “Free seedlings from [your name]’s home nursery. Water me in.”
My nursery log
Trays started this season: ___________
Transplants produced: ___________
Seedlings shared with neighbors: ___________
Crops tried from seed for the first time: ___________
My microgreen log
Trays sown this month: ___________
Crops grown: ___________
Days to harvest (fastest): ___________
Shared or sold: ___________
Get the full toolkit series + our farmer-curated Supply Guide at neighborhoodfarmsusa.org/knowledge-hub
NFUSA Field Guides help home growers grow like farmers, using simple systems that build food security, skills, and neighborhood connection.
This publication was produced by Neighborhood Farms USA, Inc. with funding provided in part by an appropriation from the State of Florida.
Join Our Newsletter
Stay informed on our progress and explore the latest insights, research, and real-world models shaping small-scale regenerative farming across the country.