

Toolkits for Growers
Balcony Micro-Farm Blueprint
Grow food where you live and grow a stronger neighborhood.
Who is this for
Apartment dwellers, condo owners, and anyone with a small patio or rooftop and 5+ hours of direct sun daily.
What you’ll get
A setup guide, crop-by-crop growing instructions, a 30-day rhythm, and troubleshooting, built by farmers, designed for your balcony.
A NOTE ON GROWING CONDITIONS
This guide is written for a national audience. Growing conditions vary significantly by region. Crops like spinach and kale thrive in cooler climates but bolt quickly in the South during summer. Fruiting crops like tomatoes and peppers need heat and long warm seasons, they perform differently in the Pacific Northwest than in the Southeast. Throughout this guide, look for regional tips and adjust timing to your local climate. When in doubt, check your USDA Plant Hardiness Zone and consult your local cooperative extension service for variety and timing recommendations specific to your area.
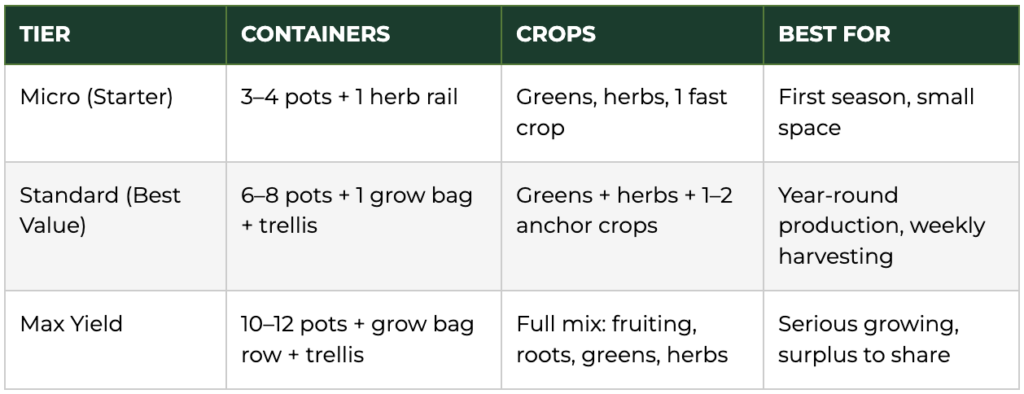
Choose Your Farm Size
SECTION 1
SETUP + SHOPPING LIST
The Balcony Reality Check
Before you buy anything, answer these three questions. They determine what you can grow and how to set up your system.
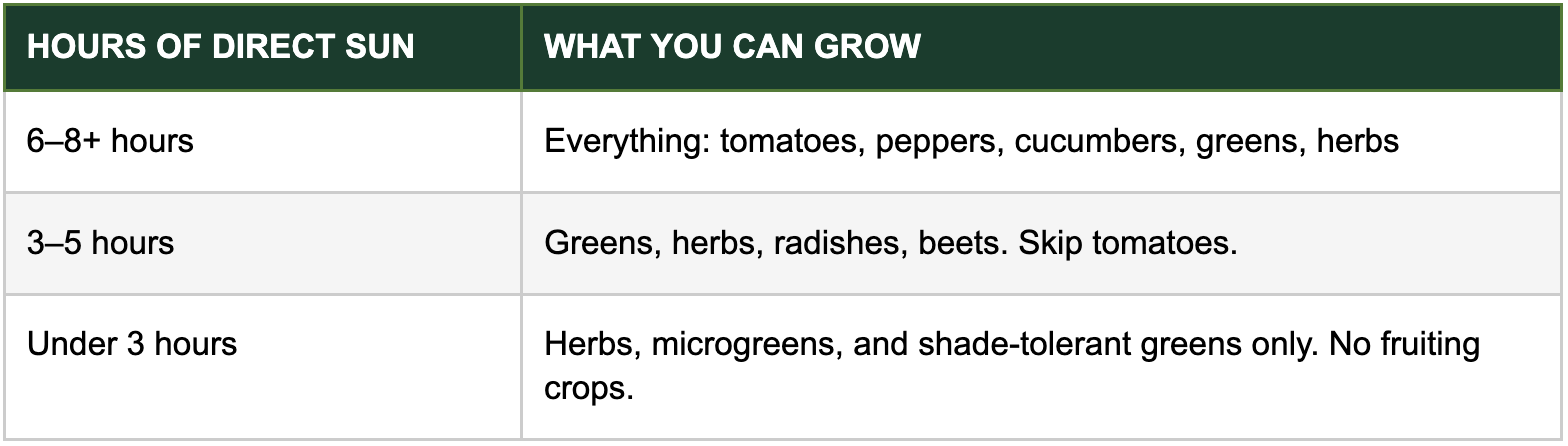
1. Sun: Map Your Hours Honestly
Observe light conditions at different times of day before deciding.
2. Wind: Don’t Underestimate It
Wind dries out containers two to three times faster than still air and physically stresses plants, snapping stems and dropping flowers before they pollinate. If your balcony is exposed, plan for it before you plant.
- Test it: Hang a lightweight ribbon from your railing for a few hours. Constant movement = bracing required.
- Use heavier containers – fabric grow bags filled with soil are often heavier than plastic pots of the same volume.
- Secure trellises to the wall or railing with clips or brackets. Never leave them resting against a surface.
3. Water: Build the System Before You Plant
Containers dry out far faster than in-ground beds, a pot can go bone-dry in 24 hours on a hot, windy day. If you can’t water daily in summer, a drip timer is essential.
- Option A: Self-watering containers with a reservoir (most reliable, lowest daily effort)
- Option B: Drip kit with emitters + battery-powered timer (set it and monitor)
- Option C: Hand-water with a quality wand, twice daily in summer (requires real discipline)
Watering Right
Overwatering kills more balcony plants than underwatering. The goal is evenly moist soil, not wet, not dry.
The Finger Test
- Dry at 2”: Water now, deeply, until it drains from the bottom.
- Moist at 2”: Check again tomorrow.
- Wet at 2”: Skip watering. If consistently wet, check drainage and reduce frequency.
How to Water Deeply
Shallow watering trains roots to stay near the surface, making them more vulnerable to heat and drought. Water slowly until you see it drain from the bottom, that means the full root zone is reached.
- Water in the early morning. Midday watering is lost to evaporation; nighttime watering can breed fungal disease.
- Never water the leaves on fruiting crops. Water at the base.
Signs of overwatering
- Yellow leaves on lower stems
- Soft, mushy stem base
- Fungus gnats hovering around soil
- Mold on soil surface
- Brown, slimy roots at drainage hole
Signs of underwatering
- Wilting in the morning before heat sets in
- Dry, cracked soil surface
- Crispy brown leaf edges
- Leaves curling inward
- Container feels noticeably lightweight
Soil Mix
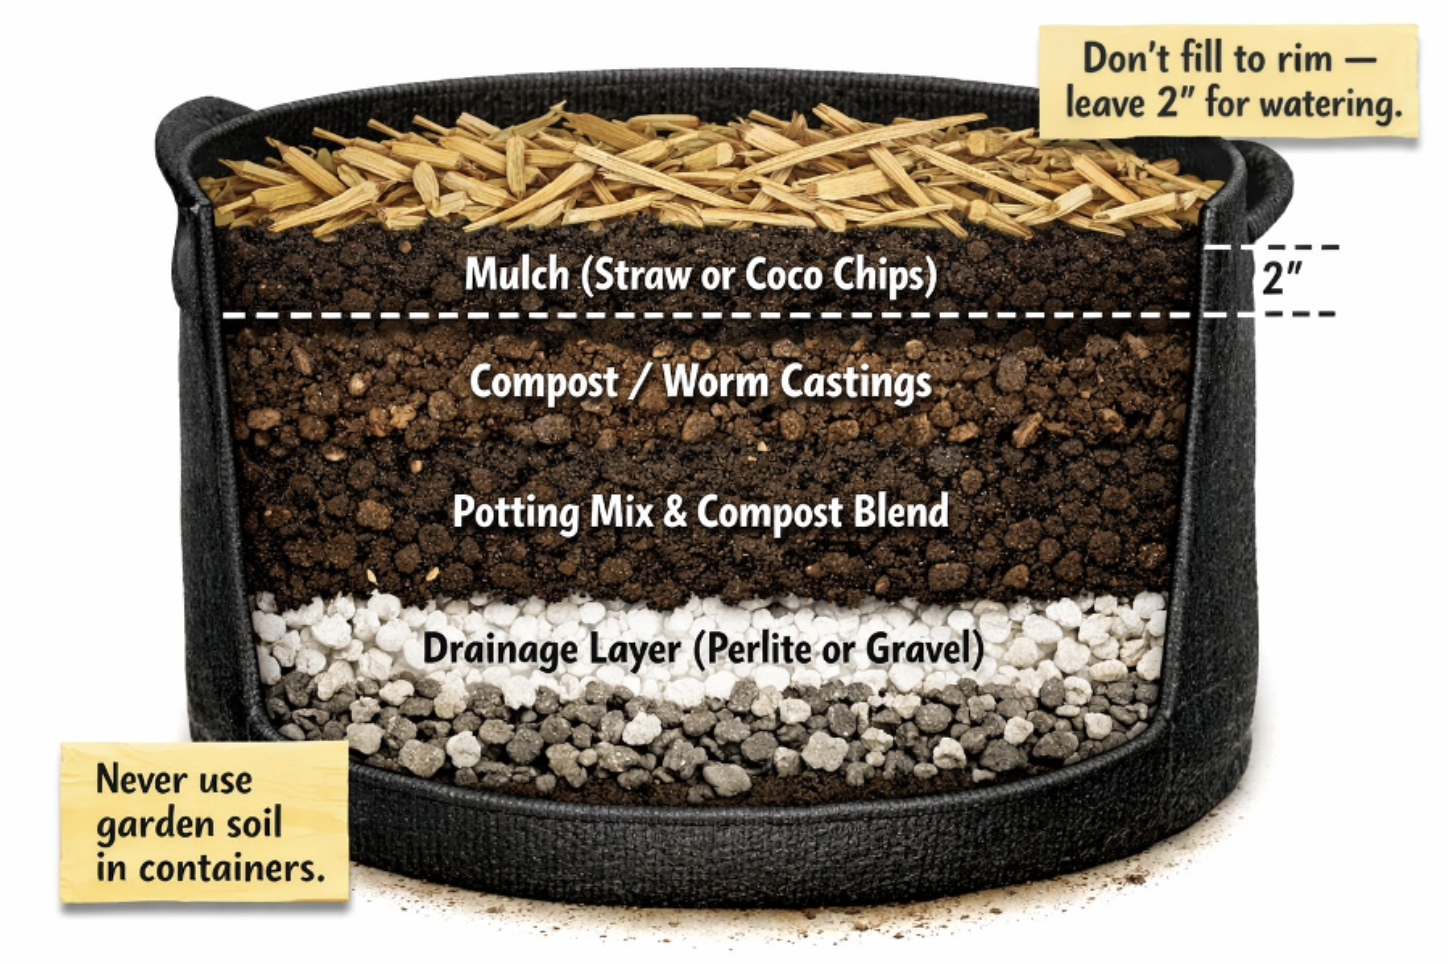
Every container in this guide uses the same base mix. Don’t substitute garden soil, it compacts solid in containers and suffocates roots. For a deeper dive into soil health and composition, see our first toolkit: How to Make Great Soil at neighborhoodfarmsusa.org/knowledge-hub.
Standard Mix (by volume):
- 60% peat-free potting mix
- 30% finished compost
- 10% perlite (for drainage)
- Add a handful of worm castings per container at planting time
At setup: Fill containers to within 2” of the rim – leave room for water to pool and absorb. Mulch the surface with straw or coco chips to cut watering frequency by 30–40%.
Shopping List: Standard Setup
Containers
- (2) 10–15 gal grow bags – fruiting crops
- (4) 3–5 gal pots – greens, herbs, scallions
- (2) 8–10” deep pots – root crops
- (2) window boxes – herbs and baby greens
Soil + Irrigation + Tools
- Peat-free potting mix + finished compost (see Soil Mix above)
- Worm castings
- Straw, coco chips, or shredded leaves (mulch)
- Drip kit + battery timer OR self-watering containers
- 1 sturdy trellis + railing clips or brackets
- Bypass pruners + harvest scissors
SECTION 2
CROP-BY-CROP GROWING GUIDE
Fruiting Crops – High Reward, High Input
Fruiting crops anchor your balcony farm. They take longer to produce but deliver continuously once they start. Key requirements: deep containers, consistent feeding, and strong support.Cherry Tomato
- Container: 10–15 gal minimum Days to harvest: 60–75 from transplant Sun: 6–8+ hours
- Plant from: Transplant (direct seed is too slow for most seasons)
- Watering: Deep and consistent. Inconsistent moisture causes blossom-end rot and fruit cracking.
- Feed: Balanced fertilizer every 10–14 days; switch to higher-potassium once fruiting begins.
- Support: Trellis or cage anchored to railing. Never rely on the pot alone.
- Prune suckers: Remove the shoot growing in the crotch between main stem and branch. Keeps energy in fruit, not foliage.
- Harvest: Cut with scissors or pruners – never pull. The more you pick, the more it produces.
Farmer Tip One well-fed, trellised cherry tomato in a 15-gal grow bag will outperform five under-potted plants.
Cucumber (Trellised)
- Container: 5–10 gal, trellised vertically Days to harvest: 50–65 from transplant Sun: 6+ hours
- Plant from: Transplant or direct seed. Cucumbers dislike root disturbance – direct sowing often works better.
- Watering: Cucumbers are 95% water. Let them dry out and they turn bitter.
- Feed: Light balanced feed early; reduce nitrogen once flowering. Too much nitrogen = vines, no fruit.
- Support: Train vines onto trellis with soft ties – not wire.
- Harvest: Pick young (6–8” for slicers). One overmature cucumber left on the plant signals it to stop producing.
Farmer Tip Check under leaves daily once fruiting begins.
Pepper (Sweet or Hot)
- Container: 3–5 gal Days to harvest: 70–90 from transplant Sun: 6–8+ hours + warmth (peppers stall below 60°F; not ideal in cool climates)
- Plant from: Transplant only. Starting from seed requires 8–10 weeks indoors.
- Watering: Moderate and consistent. Less water-hungry than tomatoes, but needs even moisture.
- Feed: Balanced until flowering; switch to low-nitrogen/high-potassium once blooms appear.
- Harvest: Leave green peppers to fully color (red, yellow, orange) for best flavor. Cut with pruners.
Root Crops – Grow Down to Grow Full
Root crops need depth above all else. Get the depth right and they’re surprisingly easy to grow in containers.
Radish
Min. Depth
6–8”
Days
21–30
Direct Sow?
Yes (only option)
How to Harvest
Pull when the shoulder appears at the soil surface. Don’t wait, they go pithy.
Beet
Min. Depth
10–12”
Days
50–70
Direct Sow?
Yes, soak seed 1 hr
How to Harvest
Harvest at golf ball size for best flavor. Tops are edible, treat like chard.
Carrot
Min. Depth
12+”
Days
60–80
Direct Sow?
Yes, sow thinly
How to Harvest
Loosen soil with a trowel before pulling. Dry soil snaps roots.
Scallion
Min. Depth
6–8”
Days
60–70 (seed) / 30 (sets)
Direct Sow?
Yes
How to Harvest
Cut outer stalks 1” above soil. Leave center to keep growing.
Turnip
Min. Depth
8–10”
Days
35–60
Direct Sow?
Yes
How to Harvest
Harvest small (tennis ball size). Tops are edible greens.
Sowing + Thinning:
- Overseed, let germinate, then thin to final spacing.
- Thin with scissors, not fingers, pulling one seedling disturbs neighbors’ roots. Snip at soil level.
- Eat your thinnings: radish and beet thinnings are excellent microgreens.
- Never let root crops dry out completely, drought causes splitting, pithy texture, and premature bolting.
Herbs – The Most Rewarding Balcony Crop
Herbs are the highest-return crop on any balcony farm. They grow fast, harvest continuously, require minimal space, and make every other ingredient in your kitchen better. Most can be tucked into window boxes, rail planters, or corners of larger containers.
Basil
Container
4–6” pot or window box
Sun
6+ hours
Harvet Method
Pinch stem tips just above a leaf pair
Key Notes
Pinch flowers immediately, once it bolts, flavor drops fast. Warm-season only; very cold-sensitive.
Cilantro
Container
4–6” pot
Sun
3–5 hours
Harvet Method
Outer stems at 3–4”
Key Notes
Bolts quickly in heat. Succession sow every 3 weeks. Best in spring and fall in warm climates.
Parsley
Container
6–8” pot
Sun
4–6 hours
Harvet Method
Outer stems at base
Key Notes
Cut-and-come-again for months. Flat-leaf (Italian) has better flavor; curly handles more shade.
Thyme
Container
4–6” pot or rail
Sun
6+ hours
Harvet Method
Snip stem tips before flowering
Key Notes
Drought-tolerant once established. Don’t overwater. Perennial in mild climates.
Mint
Container
Dedicated pot only
Sun
3–6 hours
Harvet Method
Cut stems to 1–2” above base
Key Notes
Always grow in its own container – mint spreads aggressively and will take over shared pots. Very productive.
Chives
Container
4–6” pot or edge of larger pot
Sun
3–5 hours
Harvet Method
Cut leaves 1–2” above base
Key Notes
One of the easiest herbs to grow. Regrows quickly after each cut. Flowers are also edible.
How to Harvest Herbs Without Stalling Growth:
- Never remove more than 1/3 of the plant in a single harvest.
- Always cut above a leaf node or leaf pair – this is where new growth emerges.
- For bushy herbs (basil, thyme): pinch the growing tips, not just individual leaves. This signals the plant to branch out instead of growing tall and leggy.
- For upright herbs (parsley, chives): harvest outer stems first. The center keeps producing.
- Harvest in the morning after a dry night. Morning-harvested herbs have the most concentrated flavor.
Fast-Growing Greens – Your Weekly Harvest
Fast greens are the engine of your balcony farm. They produce in 2–3 weeks and keep you harvesting while anchor crops develop. The key is cut-and-sow succession: every time you cut, sow the next batch.
Arugula
Days to first cut
21–28 days
Cut height
3–4”
Succession timing
Every 3 weeks
Farmer tip
Harvest before it bolts (flowers = bitter). Loves cool weather.
Baby lettuce mix
Days to first cut
21–28 days
Cut height
2–3” above crown
Succession timing
Every 2–3 weeks
Farmer tip
Never cut below 1” from the base – leave crown to regrow.
Spinach
Days to first cut
30–40 days
Cut height
Outer leaves at 3–5”
Succession timing
Every 3 weeks
Farmer tip
Bolts fast in heat. Best in spring and fall. Shade cloth extends season in warmer climates.
Mustard greens
Days to first cut
25–35 days
Cut height
Outer leaves
Succession timing
Every 3–4 weeks
Farmer tip
Spicy young, milder older. Extremely heat-tolerant – a strong summer option in warm climates.
How to Cut Greens:
- Use sharp harvest scissors, never pull or tear. Torn tissue invites disease and redirects plant energy to repair instead of regrowth.
- Cut the outer, oldest leaves first. The inner growing point keeps producing.
- For baby greens mix: cut the whole tray 1–1.5” above the base. It will regrow 1–2 more times before flavor declines.
- Harvest in the morning after a dry night. Morning-cut greens store longer.
- Don’t wash greens until you’re ready to eat them, washing and storing wet accelerates spoilage.
Cut-and-Come-Again Greens – Kale + Swiss Chard
Plant once. Harvest all season. Kale and Swiss chard are the workhorses of the balcony farm, unlike fast greens, they don’t need replanting after each harvest.
Kale
Container: 3–5 gal, 1 plant per pot
Days to first harvest: 50–70 from transplant
Sun: 3–6+ hours (tolerates partial shade)
Best container varieties: Dwarf Siberian, Red Russian, Lacinato
- Harvest outer leaves first, always. Leave 4–6 inner leaves intact.
- Cut stems 1” above the base. Light nitrogen feed monthly.
- In mild climates, one plant can produce for 6–12 months.
Swiss Chard
Container: 3–5 gal, 1–2 plants per pot
Days to first harvest: 45–60 from transplant
Sun: 4–6 hours (more shade-tolerant than kale)
Best container varieties: Bright Lights, Rainbow, Fordhook Giant
- Cut outer stalks at 1” from the base. Never remove all leaves at once.
- Harvest every 5–10 days once established. Frequent harvesting encourages faster regrowth.
- Balanced feed every 2–3 weeks.
SECTION 3
THE 30-DAY FARMER RHYTHM
Most balcony farms fail in weeks two and three, when initial momentum fades before consistent habits form. This plan builds a rhythm. Follow it once and the second month becomes automatic.
Week 1 – Build the System
- Position all containers before filling. Once heavy with soil, they’re very hard to move.
- Fill with your soil mix. Water thoroughly before planting to settle the mix.
- Install trellis and wind anchors before any plants are in the way.
- Plant in order: greens and herbs first, anchor crops last.
- Sow root crops directly into their final containers. Sow thick, then thin in 10–14 days.
- Set up your drip timer and run it manually once to confirm all emitters are working.
Water goal this week: Evenly moist throughout the container. Water deeply after planting and check daily.
Week 2 – Lock In Consistency
- Check moisture daily with the finger test. Adjust drip timer if needed.
- Fruiting crops: Begin light, half-strength balanced liquid feed once roots are settled (5–7 days after transplant).
- Greens: Thin to final spacing. Eat the thinnings.
- Root crops: Thin once seedlings reach 1” tall. Snip with scissors, don’t pull.
- Kale and chard: Leave completely alone this week. Let the root system establish.
- Herb rail: Pinch basil tips to encourage bushy growth.
Week 3 – Start Harvesting
- Fast greens: Begin harvesting when leaves reach 3–4”. Use sharp scissors. Outer leaves first.
- Kale and chard: Take 1–2 outer leaves per plant if 4+ leaves are established.
- Herbs: Begin cutting once plants are 4–6” tall. Never remove more than 1/3 in one session.
- Tomatoes: Prune suckers in the crotch between stem and branch.
- Succession sow: Immediately direct-sow a second round of fast greens into any open space. Keep this going from now on.
- Root crops: Radishes may be ready if sown in Week 1. Check shoulders at soil surface.
Farmer principle: Harvest small and often. The plant produces in response to being harvested. Waiting for a “big harvest moment” reduces total output all season.
Week 4 – Expand the Loop
- Fruiting crops: Flowers should be forming. Don’t over-fertilize now – too much nitrogen at this stage pushes foliage instead of fruit.
- Topdress all pots with 1” of finished compost or worm castings. Slow-release fertility for the next 4–6 weeks.
- Greens: Your second succession is coming up. Start a third sowing – keep 2–3 rotations going at all times.
- Replant every empty space immediately. Dead time = lost production.
- Kale and chard: By now you should have 8–10 leaves per plant. Harvest 2–3 outer leaves per plant per week.
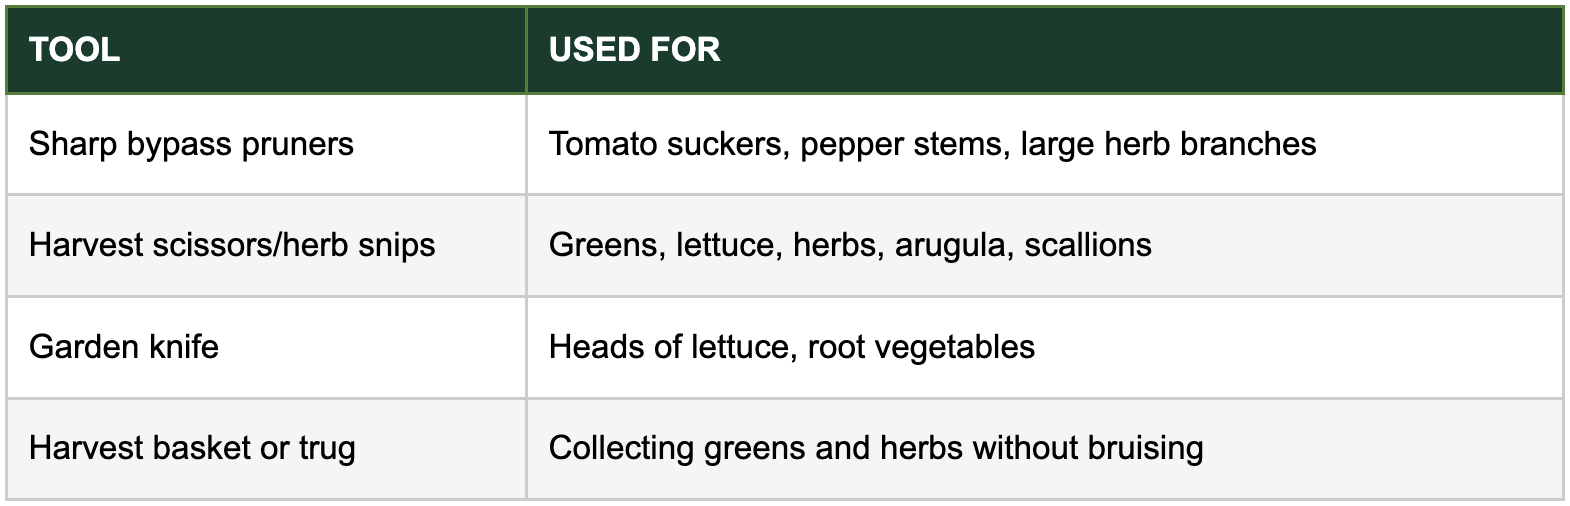
Harvesting Tools
The right cut at the right time signals the plant to keep producing. Tearing or blunt pinching damages tissue, invites disease, and slows regrowth.
SECTION 4
TROUBLESHOOTING + SHARE THE SURPLUS
Fast Fixes: Common Balcony Problems
Wilting at noon, recovers by evening
Most likely cause
Heat stress; container drying faster than watering rhythm
Fix it
Water earlier (morning). Mulch surface. Consider a larger container
Wilting in the morning before heat
Most likely cause
True underwatering
Fix it
Water more deeply and consistently. Check drainage holes aren’t blocked.
Yellow lower leaves on tomatoes or peppers
Most likely cause
Underfed, inconsistent moisture, or calcium deficiency
Fix it
Consistent watering + compost topdress + balanced liquid feed
Blossom drop, no fruit setting
Most likely cause
Temp swings, inconsistent water, wind stress, or excess nitrogen
Fix it
Stabilize water, brace trellis, cut nitrogen, increase potassium feed
Cucumbers taste bitter
Most likely cause
Moisture stress during fruit development
Fix it
Keep moisture consistent. Harvest before overmature.
Greens bolting
Most likely cause
Heat, or not harvesting frequently enough
Fix it
Harvest more often. In summer, try shade cloth or switch to heat-tolerant varieties.
Kale or chard stalling
Most likely cause
Harvesting from center/top
Fix it
Only harvest outer leaves. Protect the growing crown. Feed lightly with nitrogen.
Radishes pithy, hollow, or very hot
Most likely cause
Left in too long; heat stress
Fix it
Harvest at the first sign of shoulder swelling. Succession sow every 3 weeks.
Tiny flies around soil
Most likely cause
Overwatering; constantly wet topsoil
Fix it
Let top 1” dry between waterings. Add a sand layer on the soil surface.
White specks, sticky residue, tiny bugs
Most likely cause
Aphids or spider mites
Fix it
Blast with water, remove the worst leaves, increase airflow. Soap spray as a last resort.
Stubby or forked carrots/beets
Most likely cause
Container too shallow or soil too compacted
Fix it
Use 12” minimum depth. Blend soil well – no clumps – before sowing.
Sign up to NFUSA for the full toolkit series + our farmer-curated Supply Guide at neighborhoodfarmsusa.org
NFUSA Toolkits help home growers grow like farmers, using simple systems that build food security, skills, and neighborhood connection.
Join Our Newsletter
Stay informed on our progress and explore the latest insights, research, and real-world models shaping small-scale regenerative farming across the country.