

Toolkits for Growers
Home Composting that Actually Feeds a Garden
Compost as a nutrient strategy, not just a pile.
Who this is for
Home growers with a backyard, patio, or even a kitchen counter who want compost that actually improves their soil and grows better food.
What you’ll get
The science in plain language, every major method compared, full troubleshooting, and a farmer-level guide to applying compost where it does the most good.
The Farmer Case for Compost
Most home composting guides treat compost as a feel-good hobby: reduce waste, make something from nothing, pat yourself on the back. That’s not wrong, but it’s incomplete.
Farmers think about compost differently. Compost is a nutrient delivery system. It’s how you feed your soil biology, build long-term fertility, improve drainage and water retention at the same time, and reduce your dependence on purchased inputs. Done right, a consistent compost practice will do more for your garden’s productivity than almost anything else you can add.
This guide is built around that perspective: compost as infrastructure, not decoration.
Farmers Note
Healthy soil is the only real shortcut in gardening. Compost is how you build it, season after season, from materials that would otherwise go to waste.
SECTION 1
THE SCIENCE + YOUR METHOD
What Compost Actually Does
Compost improves your garden in ways that synthetic fertilizer cannot replicate:
- Feeds soil biology: billions of bacteria, fungi, and other organisms that make nutrients available to plants in the right form at the right time
- Slow-release nutrition: N, P, and K are released gradually as organic matter breaks down, no nutrient spikes, no leaching
- Improves soil structure: in clay soils it loosens and aerates; in sandy soils it improves water and nutrient retention
- Suppresses some diseases: a biologically active soil is naturally more resistant to soil-borne pathogens
- Buffers pH: mature compost gently moves soil toward a neutral pH over time, where most nutrients are most available
Choose Your Method
The best composting method is the one that matches your space, time, and how much material you generate. Here are the five main systems:
Cold Pile
Best for
Set-and-forget composting; low material volume
Time to finish
6–18 months
Effort level
Low (add, ignore, wait)
Space needed
Backyard
Hot Pile
Best for
Fastest results; high material volume; kills weed seeds
Time to finish
4–8 weeks (active management)
Effort level
High (turn every 2–3 days)
Space needed
Backyard (3x3x3 ft min)
Worm Bin (Vermicompost)
Best for
Kitchen scraps; apartment or small space; highest quality output
Time to finish
2–3 months
Effort level
Low–Medium
Space needed
Any size (indoors OK)
Bokashi
Best for
ALL food scraps incl. meat + dairy; no odor; urban/apartment
Time to finish
2–4 weeks ferment + 2 weeks cure
Effort level
Low
Space needed
Countertop to small bin
Tumbler
Best for
Clean, rodent-resistant; small yards and suburban spaces
Time to finish
4–12 weeks
Effort level
Low–Medium
Space needed
Small footprint
Farmers Note
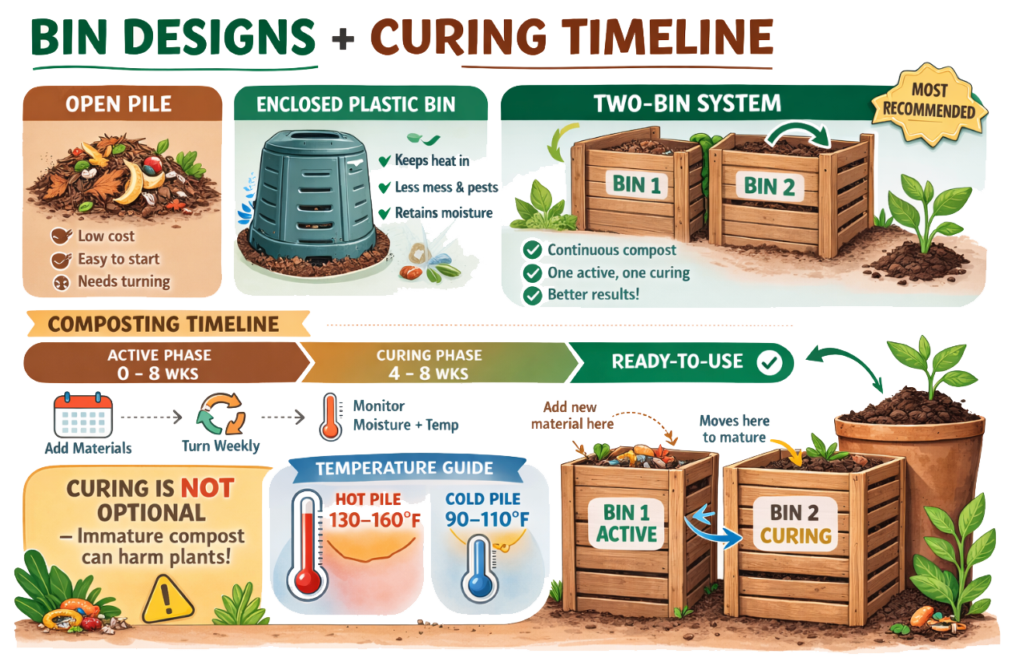
Most home growers do best with a two-bin system: one bin actively receiving material, one bin curing. This gives you a continuous supply of finished compost without stopping production to wait.
What to Compost and What to Leave Out
Compost is built from two categories of material. The right balance between them is the whole game.
GREENS (Nitrogen-rich)
- Vegetable + fruit scraps
- Fresh grass clippings
- Coffee grounds + paper filters
- Plant trimmings (disease-free)
- Eggshells
- Seaweed or kelp
- Fresh manure (herbivores only)
BROWNS (Carbon-rich)
- Dry leaves (best carbon source)
- Cardboard (uncoated, torn up)
- Paper bags, newspaper
- Straw or hay
- Wood chips or sawdust (untreated)
- Paper egg cartons
- Dried plant stalks
Leave These Out and Why
• Meat, fish, bones, dairy – attract pests, create odor, slow decomposition (unless using Bokashi)
• Diseased plants or plants with pest eggs – unless you’re hot composting above 140°F
• Weeds that have gone to seed – seeds survive cold piles and come back in your garden
• Dog or cat waste – potential pathogens, not safe for edible gardens
• Treated wood products (painted, stained, pressure-treated) – chemical contamination
• Invasive plants (e.g. Bermuda grass roots) – they will survive and spread
SECTION 2
THE RECIPE + TROUBLESHOOTING
The Compost Recipe: Browns to Greens
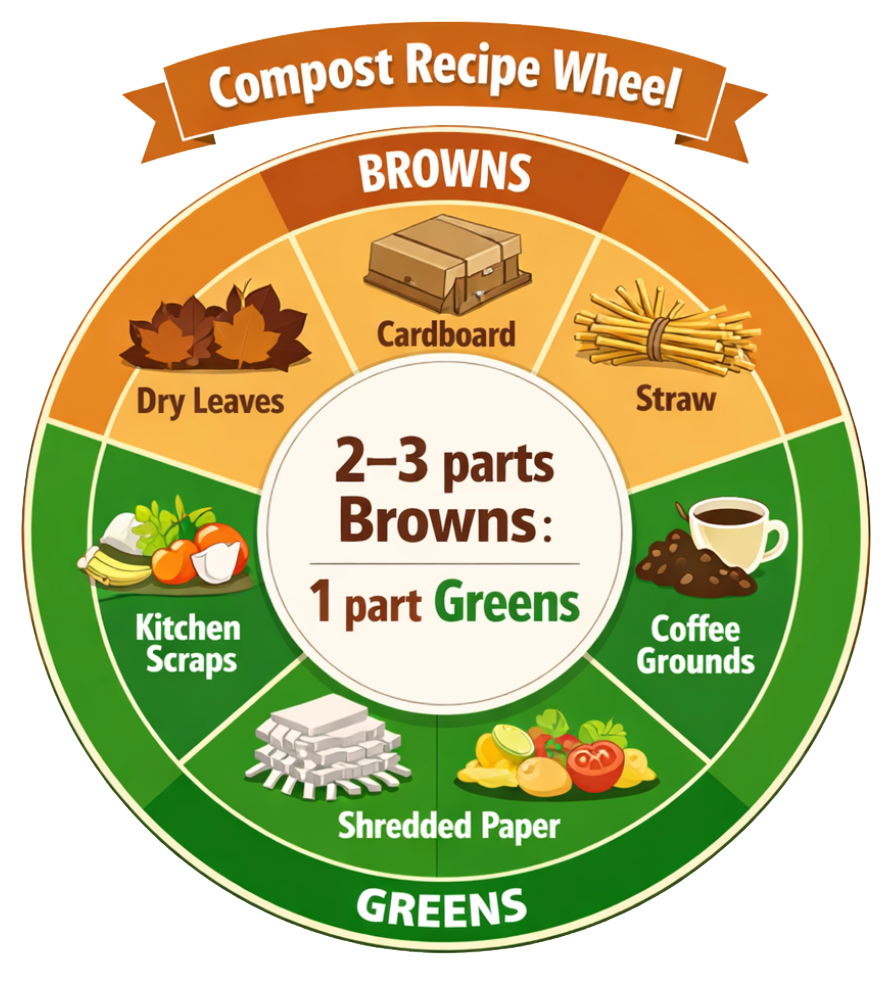
The core principle of effective composting is balancing carbon (browns) and nitrogen (greens) to feed the microbial community that does the actual decomposition work.
THE RATIO
2–3 parts BROWNS to 1 part GREENS
IN PRACTICE
Every time you add a bucket of kitchen scraps (greens), layer in 2–3 buckets of dry leaves or shredded cardboard (browns).
Pile should feel like a wrung-out sponge: moist but not dripping, with visible air pockets.
Farmers Note
Always keep a bag of dry leaves, shredded cardboard, or straw near your compost bin. Without a ready carbon source, greens pile up, the pile goes anaerobic, and you get the classic “my compost smells” problem.
Managing Moisture and Aeration
- Moisture: the pile should feel like a wrung-out sponge throughout. Too dry = decomposition stops. Too wet = anaerobic, smelly.
- Aeration: microbes need oxygen. Turning the pile introduces air. Hot composting requires turning every 2–3 days. Cold composting: every 2–4 weeks is fine.
- Temperature: an active hot pile will reach 130–160°F in the center. This kills weed seeds and pathogens. Cold piles skip this stage but work eventually.
Troubleshooting Your Pile
Smells like rotten eggs or sewage
Cause
Too wet + not enough air (anaerobic)
Fix
Turn pile, add dry browns, improve drainage at base
Smells like ammonia
Cause
Too much nitrogen (greens), overheating
Fix
Add browns, turn to aerate and cool
Pile not heating up
Cause
Too dry, too small, or wrong ratio
Fix
Add water, add greens, turn, and build pile larger (3x3x3 ft minimum for hot composting)
Pile heating then stopping
Cause
Normal cycling for cold piles; hot pile needs more material or turning
Fix
Add fresh material to hot pile; cold pile is just slow — that’s OK
Pests (rodents, flies)
Cause
Meat/dairy added, or greens not buried
Fix
Remove problem materials; bury greens in center; switch to closed bin
Material not breaking down
Cause
Too much woody/carbon material, or too dry
Fix
Shred or chip material smaller, add water and nitrogen source
SECTION 3
CURING + FEEDING YOUR GARDEN
Is Your Compost Ready? The Farmer’s Test
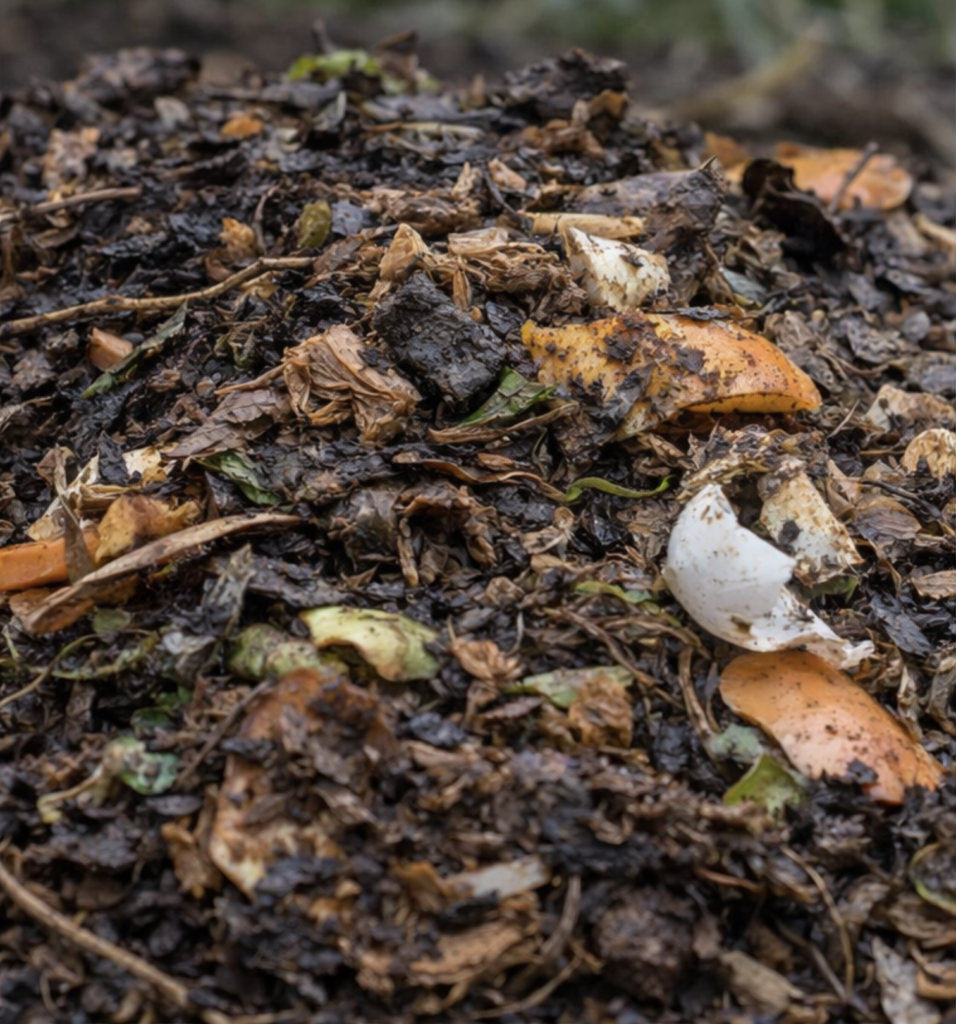
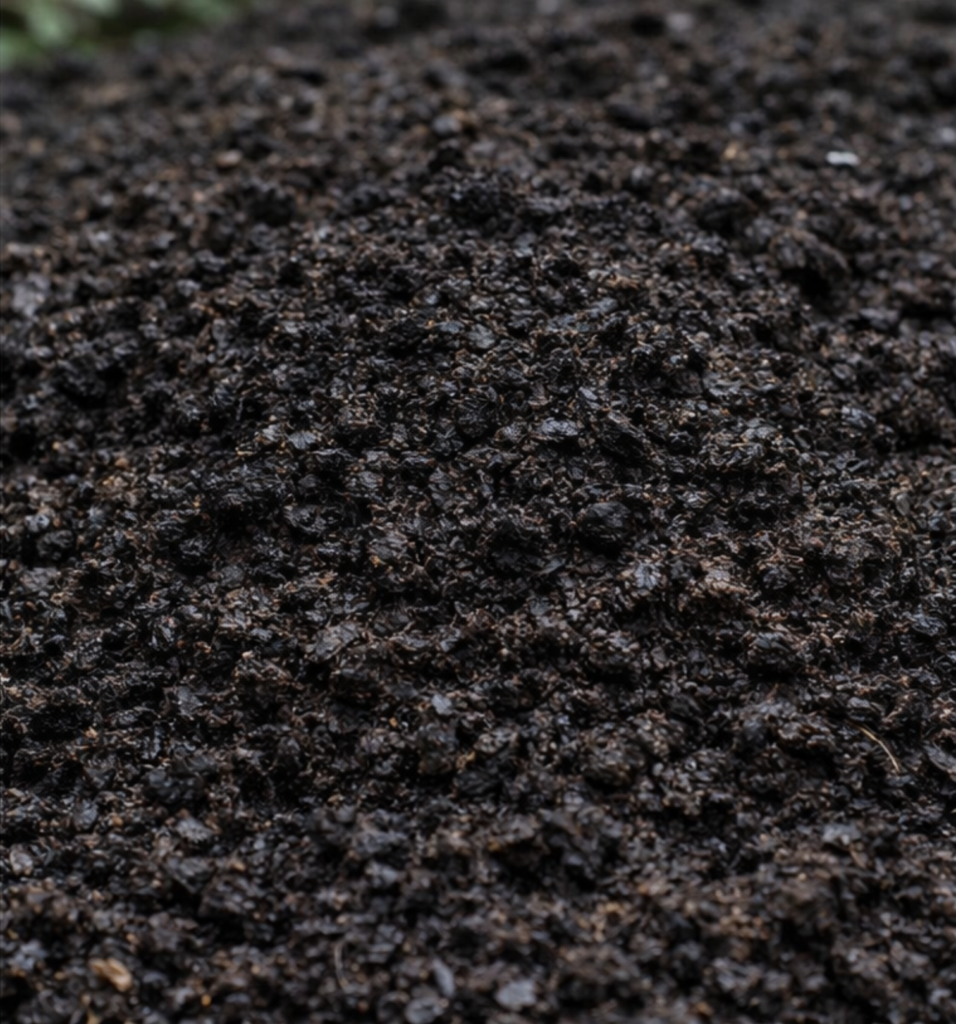
This is one of the most important, and most skipped steps. Applying immature compost to your garden can actually hurt your plants by robbing available nitrogen from the soil as it finishes decomposing. Finished compost must pass all four checks:
Smell
Finished compost looks/smells like:
Rich, earthy, like forest floor soil
Not ready if:
Still smells like ammonia or rotting food
Appearance
Finished compost looks/smells like:
Dark brown, uniform, crumbly texture
Not ready if:
Original materials still recognizable (large chunks)
Temperature
Finished compost looks/smells like:
Room temperature throughout (no internal heat)
Not ready if:
Center is still warm or hot
Bag test
Finished compost looks/smells like:
Sealed in bag for a week: no bad odor
Not ready if:
Bag smells sour or rotten after a week
Farmers Note
Nitrogen robbery is real. Partially decomposed compost acts as a carbon sink, pulling nitrogen out of your soil to finish breaking down. This leaves plants yellowed and stunted. Always let compost fully cure before applying it to growing beds.
How to Apply Compost to Your Garden
Different application methods serve different purposes. Use the right one for the job:
Topdress (surface layer)
Rate/Depth
1–2” layer on top of soil; don’t dig in
When + Why
Monthly on active beds; feeds soil biology, improves moisture retention
Incorporate (dig in)
Rate/Depth
2–4” worked into top 6” of soil
When + Why
At bed setup or before a new planting season; builds soil structure
Compost tea (liquid)
Rate/Depth
Dilute 1:10 with water; apply as drip or foliar
When + Why
Bi-weekly on heavy feeders; fastest nutrient delivery to plants
Transplant hole amendment
Rate/Depth
1–2 large handfuls per planting hole
When + Why
When transplanting seedlings; gives roots an immediate biological boost
Potting mix blend
Rate/Depth
20–25% compost by volume in container mix
When + Why
When building or refreshing container soil systems
Your Year-Round Compost Rhythm
Compost isn’t a one-time project, it’s an ongoing system. Here’s how to build it into your growing year:
- Every week: collect kitchen scraps, add to bin with browns, check moisture
- Every month: turn active pile, topdress growing beds with any ready material
- Every season: move cured compost to a second bin or barrel, start fresh active pile
- Before each planting: incorporate 2–4” of finished compost into beds before transplanting
- End of season: apply a generous topdress to all beds to protect soil biology through dormancy
NFUSA: Compost Is a Community Practice
At the neighborhood scale, composting multiplies in value. A single home composter captures nutrients that would otherwise leave the local ecosystem. Ten home composters on a block do something more: they build a culture of soil stewardship that feeds better gardens, shares knowledge, and reduces waste at scale.
- Share finished compost: offer a bucket of finished compost to a neighbor who’s just starting, it jumpstarts their bin with beneficial microbes
- Organize a leaf collection: collect and redistribute dry leaves in fall to neighbors who need carbon material
- Find a local composting program: Many cities and counties now run free or low-cost food scrap drop-off sites, curbside organics pickup, and community bin networks. Search “[your city] + food scraps program” or “[your city] + composting drop-off” to find what’s available where you live.
- Municipal and county programs: Cities like San Francisco, Seattle, Portland, and New York have curbside composting built into their waste services. Check your city’s public works or sanitation department website, these programs often accept all food scraps, including meat and dairy, because they use industrial composting systems that home bins cannot.
- Community garden and farm drop-offs: Many neighborhood farms and community gardens accept raw kitchen scraps in exchange for finished compost or simply as a community service. Use the NFUSA farm directory at neighborhoodfarmsusa.org to find farms and community gardens near you that may participate.
- Farmers market collections: Some local farmers markets host weekly compost drop-off stations. Bring your scraps in a sealed container, drop them off, and many programs return finished compost to participants seasonally.
- App-based compost networks: Apps like ShareWaste connect home composters with nearby gardeners and farms that accept food scraps. If you don’t have space for a bin of your own, these networks let you participate in the compost loop without managing the pile yourself.
Next in the series: Backyard Raised Beds That Don’t Fail , uses compost as the core fertility strategy
NFUSA Field Guides help home growers grow like farmers, using simple systems that build food security, skills, and community connection.
Join Our Newsletter
Stay informed on our progress and explore the latest insights, research, and real-world models shaping small-scale regenerative farming across the country.