

Toolkits for Growers
Backyard Raised Beds That Don't Fail
Build it right. Fill it right. Keep it producing in year three.
Who is this for
Anyone buidling a raised bed in a backyard, a shared lot, or a building terrace, whether it’s your first bed or your fifth that keeps underperforming.
What you’ll get
A siting guide, bed specs, a soil system with three budget levels, accessories that matter, a drip irrigation plan, a succession calendar, and a fertility maintenance routine that keeps the bed producing past year two.
There is no shortage of raised bed construction guides. Most cover the lumber, the corners, and a bag of potting mix. This toolkit covers what they don’t: the soil system inside the bed, the accessories that make it work, and the maintenance plan that keeps it producing when most backyard beds quietly fail around year two. The construction is one afternoon. The system runs for years.
REGIONAL NOTE
This guide is written for a national audience. Planting windows, soil temperature timing, and crop selection vary significantly by region. Look for regional callout boxes throughout. For your local calendar, check your USDA Plant Hardiness Zone and cooperative extension service. For curated bed hardware, soil inputs, and irrigation supplies, see the NFUSA Supply Guide at neighborhoodfarmsusa.org/knowledge-hub.
SECTION 1
LOCATION — THE MISTAKE THAT CANNOT BE UNDONE
Where you put the bed decides everything that follows. A bed in the wrong spot cannot be fixed with better soil or more water. Get these four factors right before you break ground.
Sun
Six hours of direct sunlight is the minimum for fruiting crops (tomatoes, peppers, cucumbers, squash). Greens, herbs, and root crops manage in 4–5 hours. Under 3 hours: herbs and leafy greens only, and expect reduced yields even from those.
- Track sun across the whole day before committing. Morning shade from a fence that clears by 10 AM is different from afternoon shade from a building that arrives at 1 PM. A crop that needs afternoon heat stalls in one and thrives in the other.
- South-facing or west-facing exposures give the most total hours. East-facing gives gentle morning sun and afternoon shade, excellent for greens and herbs, marginal for fruiting crops.
- Mark your sun hours at the actual season you’ll be growing. Summer sun arcs higher; winter sun stays low and can be blocked by fences or structures that cause no problem in summer.
THE IRREVERSIBLE MISTAKE: Installing a bed under a tree. Roots grow toward the nutrient and moisture-rich raised bed and compete aggressively with crops. Canopy drip concentrates soil-borne disease. And shade from a tree is not the gentle, consistent shade of a north wall, it’s patchy, moves through the day, and changes as the tree leafs out. A bed installed under a tree will underperform every season.
Drainage
Raised beds drain better than in-ground beds by design, but only if the ground beneath them drains too. A bed sitting on clay, hardscape, or compacted soil that doesn’t drain will wick moisture upward in wet seasons and create waterlogged conditions at the root zone even with well-built soil above.
- Before you build: dig a 12” hole where the bed will sit. Fill it with water. If it drains in under an hour, you’re fine. If it’s still standing water after two hours, plan for it, add 2–4 inches of coarse gravel under the bed, or raise the bed on legs.
- On concrete, pavers, or a rooftop deck: drainage is controlled entirely by the bed itself. Beds on hard surfaces must have open bottoms or drainage holes, and always need a clearance of at least 1–2” between the bed base and the surface for airflow and drainage.
- Avoid low spots where water pools during rain. One heavy rain event that drowns a bed’s root zone can set back an entire planting by two to three weeks.
Water Access
The most common reason backyard beds stop producing is not pest pressure or bad soil, it’s the daily watering that becomes a chore and then a missed week in August. Solve for water access before you build.
- Place the bed within reach of a hose bib, or plan your drip line routing from the start. A bed that requires carrying water will be underwatered.
- If you’re running a drip line, map the route from the spigot to the bed location before you finalize placement. Drip line should run along walls or fences, not across walkways or grass.
- Automation: a $25–40 battery-powered timer on the hose bib is the single most impactful investment after the bed itself. Water is never forgotten and never skipped during vacation or a busy week.
SECTION 2
BED DIMENSIONS + MATERIALS
Dimensions That Match How You Actually Work
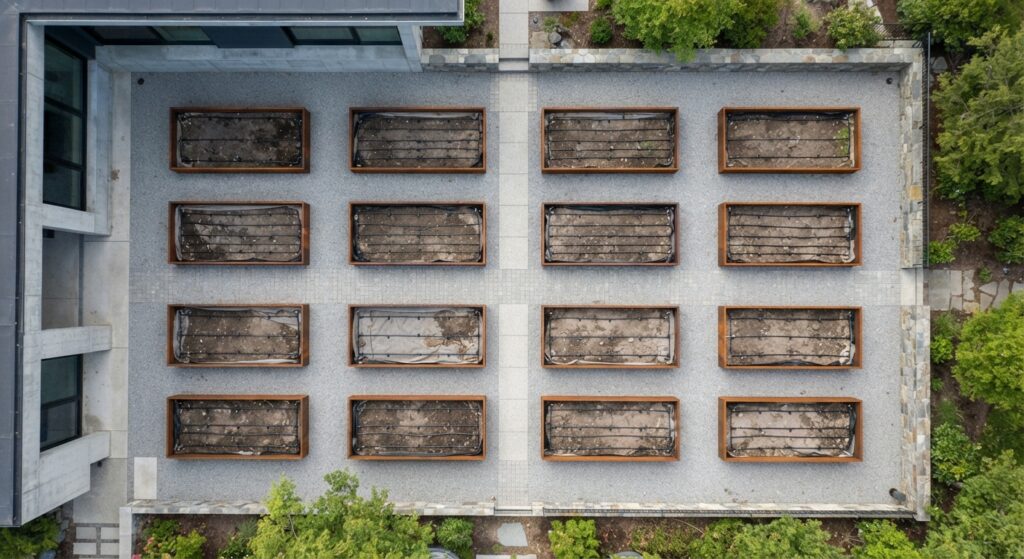
The standard 4×8’ bed is standard for a reason: a person can reach the center of a 4’ wide bed from either side without stepping in. The moment you step into a bed, you compact the soil, and compaction undoes everything the raised bed was built to provide.
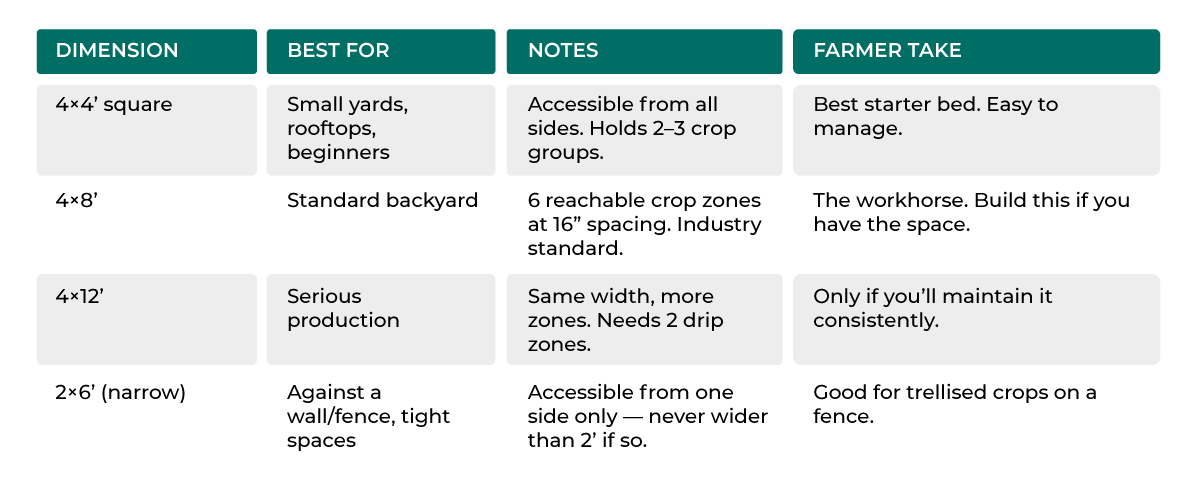
Height matters more than people realize. The minimum functional height for most vegetable crops is 10–12”. This is enough root depth for greens, herbs, and shallow-rooted crops. For tomatoes, peppers, and root vegetables (carrots, beets), 17–20” is the target, it also dramatically reduces the need for watering by holding more soil volume. Beds shorter than 8” are decorative planters, not food production beds.
FARMER NOTE: If you’re choosing between one large bed and two small beds for the same footprint, choose two. Separate beds mean better crop rotation, better pest containment, and the ability to manage each bed’s soil and fertility independently.
Materials: What to Buy, What to Avoid, and Why
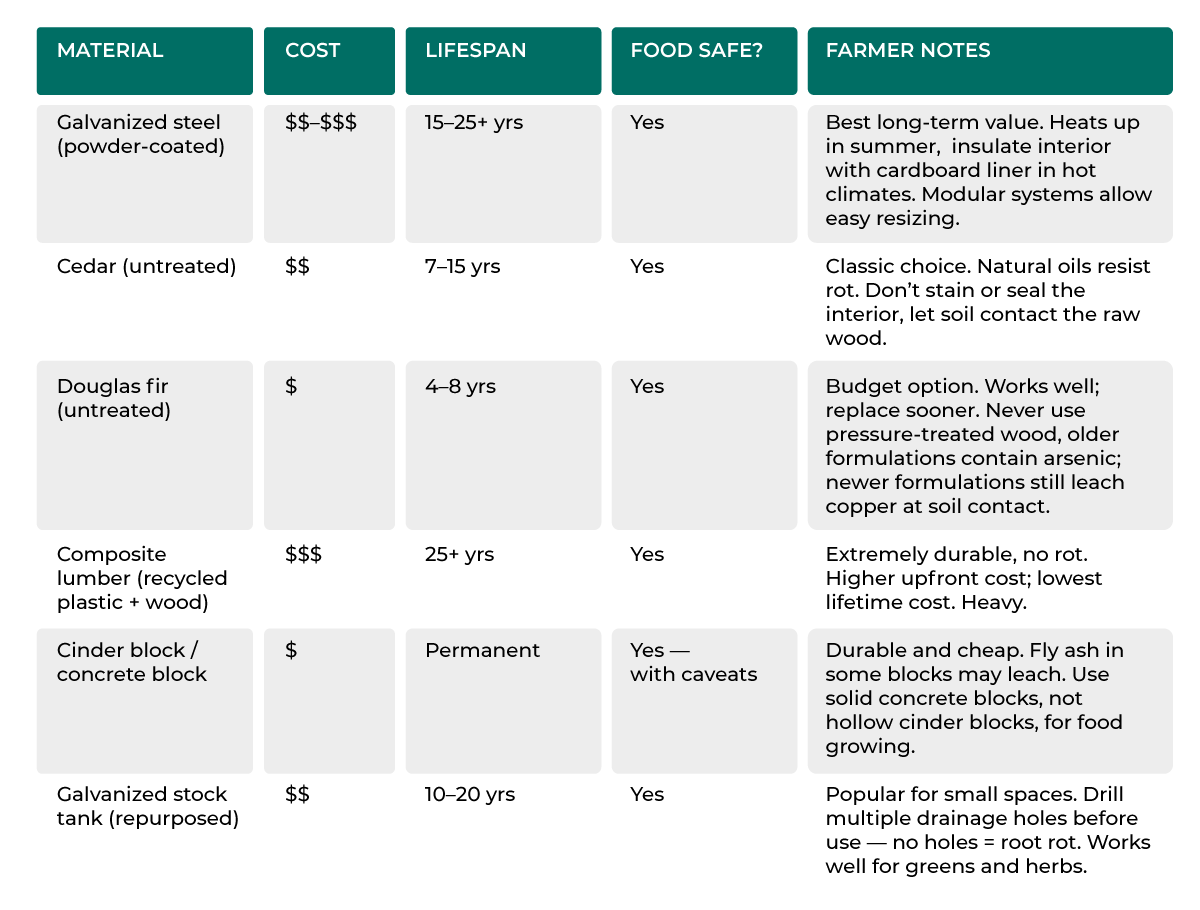
NEVER USE: Railroad ties, pressure-treated lumber marked CCA (chromated copper arsenate), old telephone poles, or creosote-treated wood. These leach compounds into soil that accumulate in root vegetables and leafy crops. If the wood smells like oil or chemicals, it does not go near a food garden.
The Open-Bottom Principle
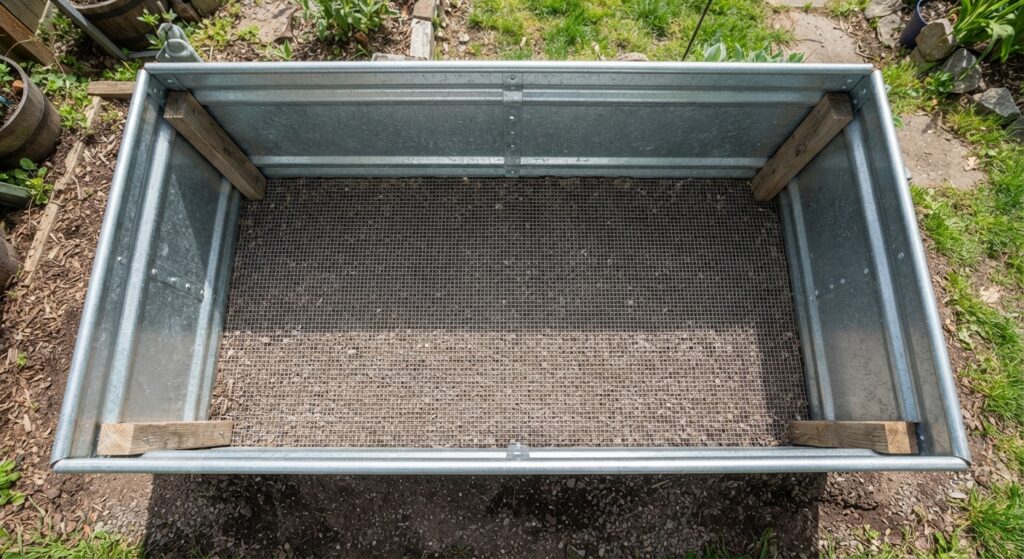
The most common mistake in raised bed selection is buying a bed with a solid bottom, or placing a landscape fabric or liner underneath that blocks drainage and root extension. Raised beds perform best with open bottoms directly on soil or coarse gravel.
- Open bottoms allow roots of deep crops (tomatoes, squash, carrots) to extend below the bed into native soil, this is a significant yield advantage in established beds.
- Open bottoms allow drainage in heavy rain events. A closed-bottom bed in a Florida thunderstorm becomes a pool.
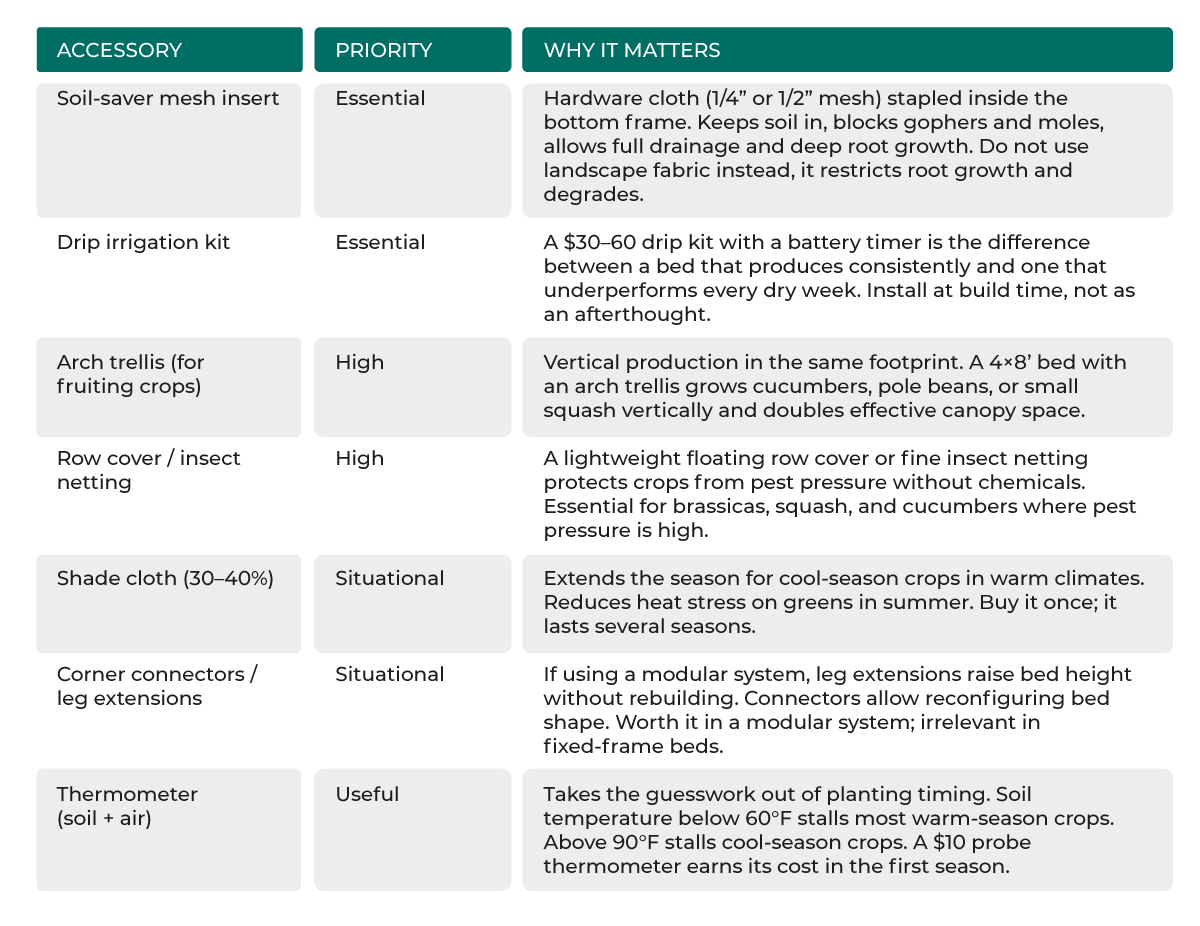
- Soil-saver inserts: fine mesh or hardware cloth stapled to the inside bottom of the bed keeps soil in, allows drainage and root extension, and blocks burrowing pests from below. This is the right solution, not landscape fabric, which restricts roots and drainage simultaneously.
- Wicking Beds for Hard Surfaces: When constructing on non-porous ground like paved patios, balconies, or building terraces, self-watering wicking systems offer an ideal workaround. These closed-bottom setups feature a subterranean water reservoir separated from the roots, complete with a dedicated fill pipe and drainage overflow. Capillary action draws moisture upward directly into root systems, drastically cutting down irrigation frequency. These fully contained units eliminate runoff onto underlying structures and excel in hot environments where topsoil dries out rapidly. Because standard soil blends compact and block upward water movement, they demand a lighter, highly aerated growing mix.
Accessories That Actually Matter
A raised bed is a system, not just a box. The right accessories determine whether it’s easy to manage or a constant fight.
- Open bottoms allow roots of deep crops (tomatoes, squash, carrots) to extend below the bed into native soil, this is a significant yield advantage in established beds.
- Open bottoms allow drainage in heavy rain events. A closed-bottom bed in a Florida thunderstorm becomes a pool.
- Soil-saver inserts: fine mesh or hardware cloth stapled to the inside bottom of the bed keeps soil in, allows drainage and root extension, and blocks burrowing pests from below. This is the right solution, not landscape fabric, which restricts roots and drainage simultaneously.
- Wicking Beds for Hard Surfaces: When constructing on non-porous ground like paved patios, balconies, or building terraces, self-watering wicking systems offer an ideal workaround. These closed-bottom setups feature a subterranean water reservoir separated from the roots, complete with a dedicated fill pipe and drainage overflow. Capillary action draws moisture upward directly into root systems, drastically cutting down irrigation frequency. These fully contained units eliminate runoff onto underlying structures and excel in hot environments where topsoil dries out rapidly. Because standard soil blends compact and block upward water movement, they demand a lighter, highly aerated growing mix.
SECTION 3
SHEET MULCHING + THREE SOIL RECIPES
Sheet Mulching the Base — Skip the Expensive Fill
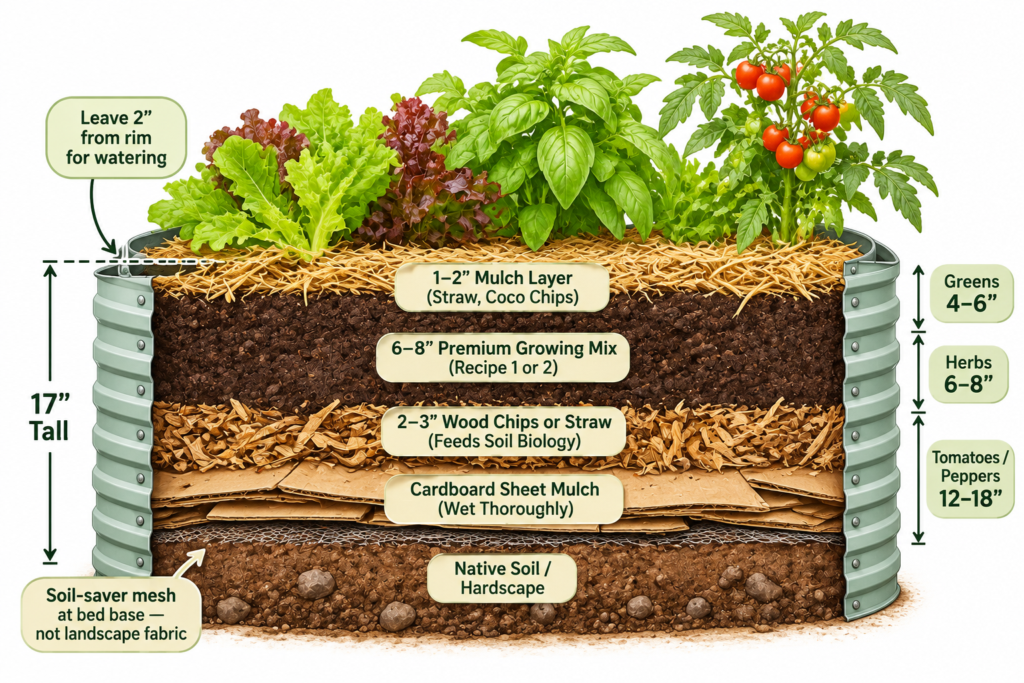
The bottom 4–6” of a raised bed does not need to be your premium growing mix. Sheet mulching builds fertility from the ground up, suppresses weeds, feeds soil biology as it breaks down, and costs almost nothing.
- Mow or cut any existing vegetation at the bed site down to the ground.
- Lay cardboard (uncoated, no tape, staples removed) directly on the soil, overlapping edges by 6– 8” to prevent gaps where weeds push through. Wet it thoroughly.
- Over the cardboard: add 2–3” of wood chips, straw, or shredded leaves. This layer feeds the fungi and bacteria that will break down the cardboard and begin building soil biology.
- Over the organic layer: add your growing medium (see soil recipes below) to fill the bed to within 2” of the rim.
- The cardboard suppresses existing weeds and grass completely within 4–6 weeks. By month two, earthworms colonize the decomposing layer from below. By year two, the distinction between your imported growing medium and the native soil below begins to dissolve, which is exactly what you want.
FARMER NOTE: Sheet mulching is not a shortcut, it’s the professional method. Commercial market gardeners use it on new ground because it suppresses weeds, builds biology, and costs a fraction of digging out or using herbicide. The cardboard under a raised bed is doing the same job.
Three Soil Recipes at Three Budgets
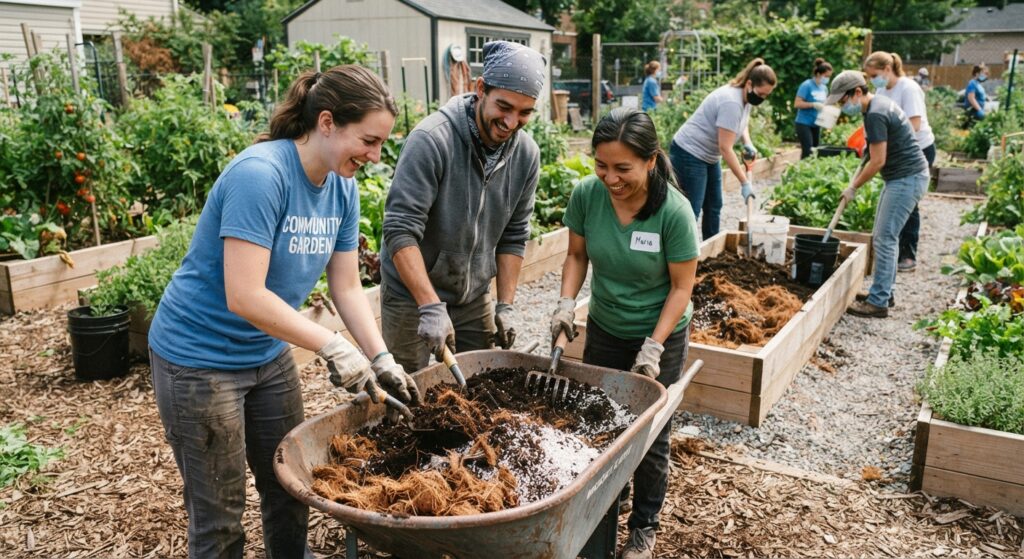
These are not potting mixes from a bag. These are working soil systems, the same type of blend a commercial market gardener uses in intensive vegetable production. The difference between the three is cost and how much of the biology is already active at planting time.
Recipe 1 — Best (The Farmer’s Blend)
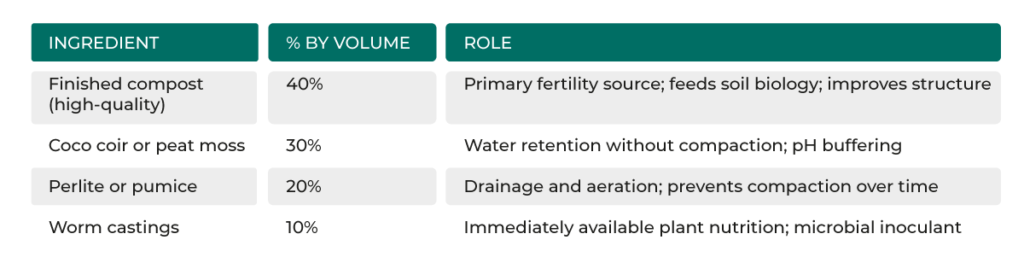
Cost per 4×8’ × 17” bed (approx. 32 cu ft fill): $120–$200 depending on compost source. Best yields, lowest maintenance, and the self-renewing biology that holds up in year two and three.
Recipe 2 — Better (The Standard Backyard Blend)
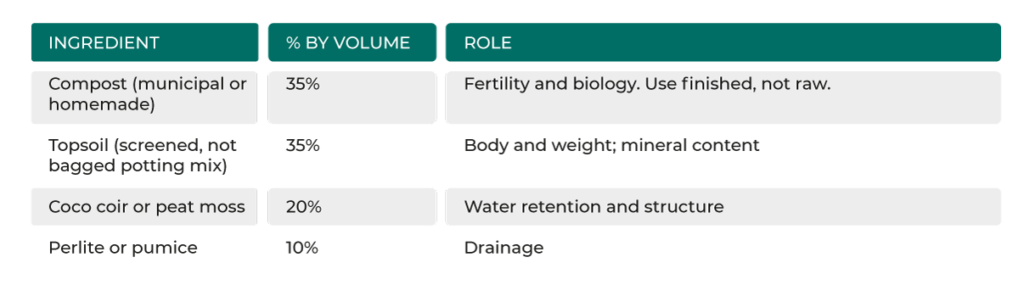
Cost per 4×8’ × 17” bed: $70–$120. Performs well in year one and two if topped annually with compost. Requires earlier intervention on fertility than Recipe 1
Recipe 3 — Good (The Budget Start)
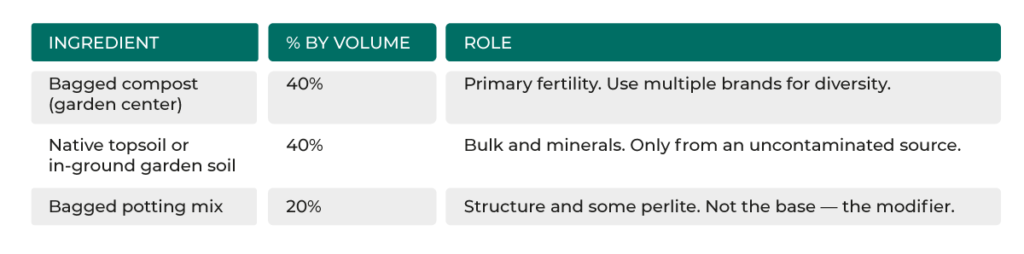
Cost per 4×8’ × 17” bed: $30–$60. Works for a first season but compacts faster and loses fertility quickly. Upgrade with annual compost additions or it will underperform by year two.
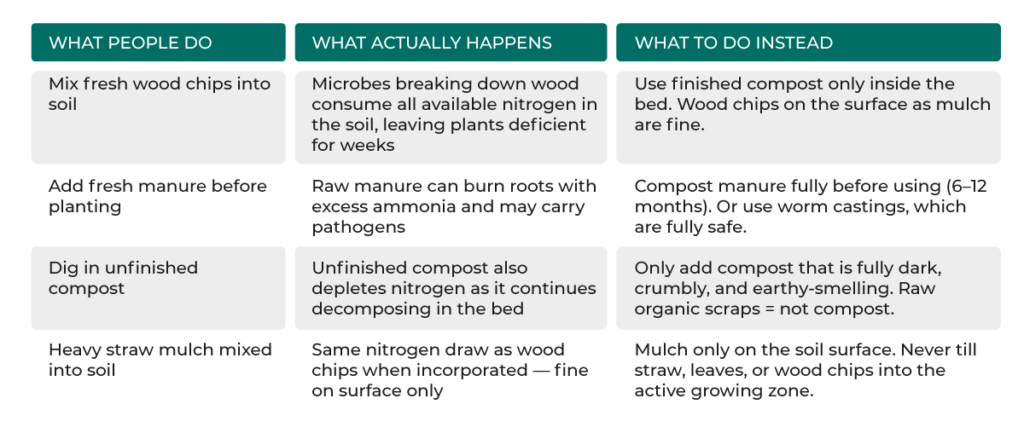
WHAT STEALS NITROGEN: Fresh (uncomposted) wood chips or mulch incorporated directly into the soil mix. Wood chips on the surface are excellent mulch. Mixed into the soil, they trigger a microbial nitrogen-draw as they decompose, robbing plants of available nitrogen for weeks. Use finished compost only, never fresh organic material, inside the soil recipe.
SECTION 4
DRIP IRRIGATION — AUTOMATE FROM DAY ONE
A raised bed’s soil drains well by design, which means it also dries out faster than in-ground beds. In summer, a well-built 4×8’ bed needs 1–2 gallons of water per day in warm weather. Hand watering this daily is sustainable for about three weeks before life gets in the way. A drip system installed at build time costs less than a missed harvest.
The Case for Drip Over Overhead Watering
- Drip delivers water directly to the root zone, not to the aisle paths, the leaves, or the weeds.
- Wet foliage is the leading cause of fungal disease in a raised bed. Drip keeps the canopy dry.
- Drip with a timer eliminates the most common cause of raised bed failure: irregular or missed watering during heat events.
- Drip uses 30–50% less water than overhead watering for the same crop performance.
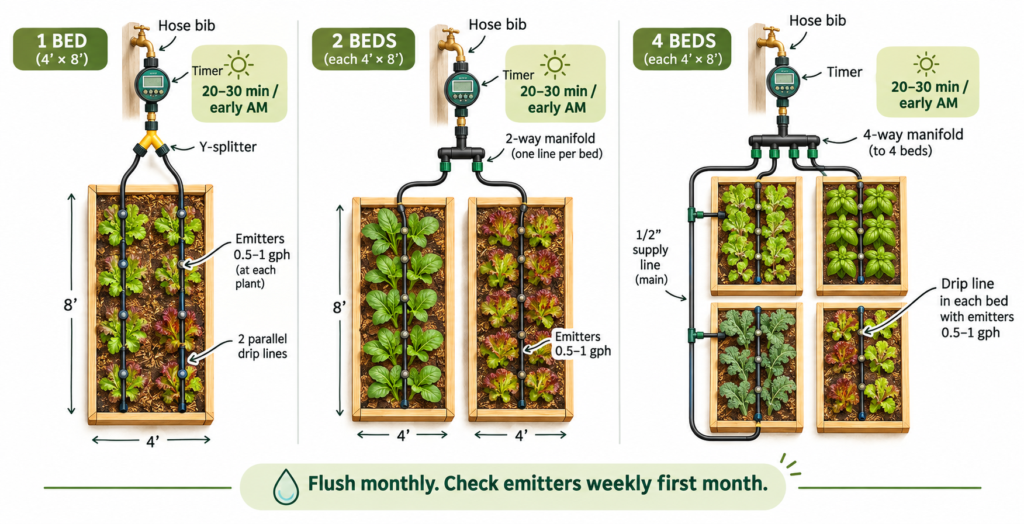
Drip Layout by Bed Count
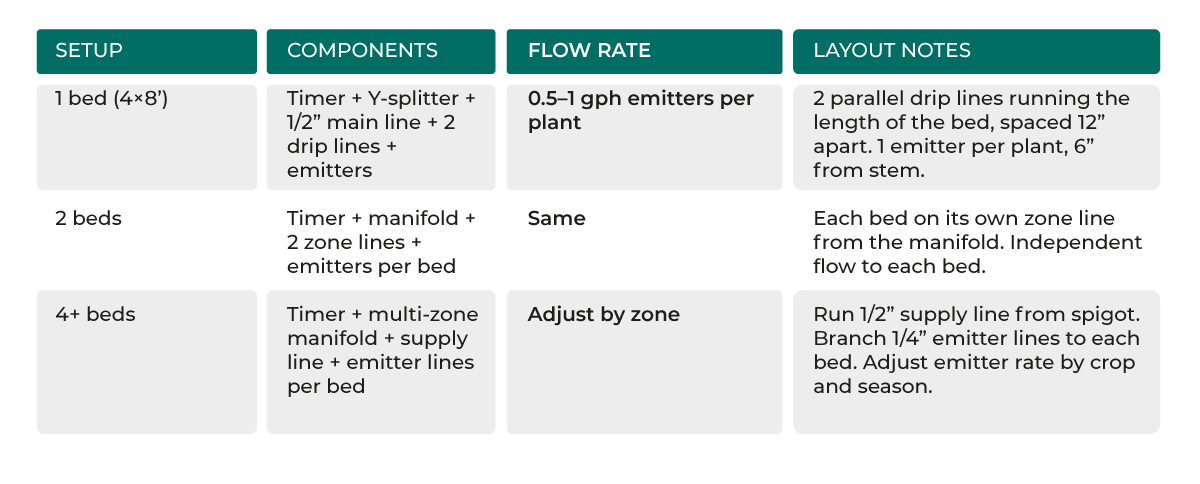
- Set the timer to run 20–30 minutes in the early morning, before heat. This allows moisture to absorb before evaporation peaks.
- Check emitters weekly during the first month. Clogged emitters are the most common drip failure. Flush the line monthly.
- Adjust run time by season: a cool-season bed may need 15 minutes every 2 days. A summer fruiting bed may need 30 minutes daily.
FARMER NOTE: The drip timer pays for itself in the first missed week of hand watering. A battery-powered timer costs $25–40. A failed crop from drought stress during a vacation week costs you the whole season. This is not optional infrastructure.
SECTION 5
SUCCESSION PLANTING — GROW LIKE A FARMER IN A SMALL SPACE
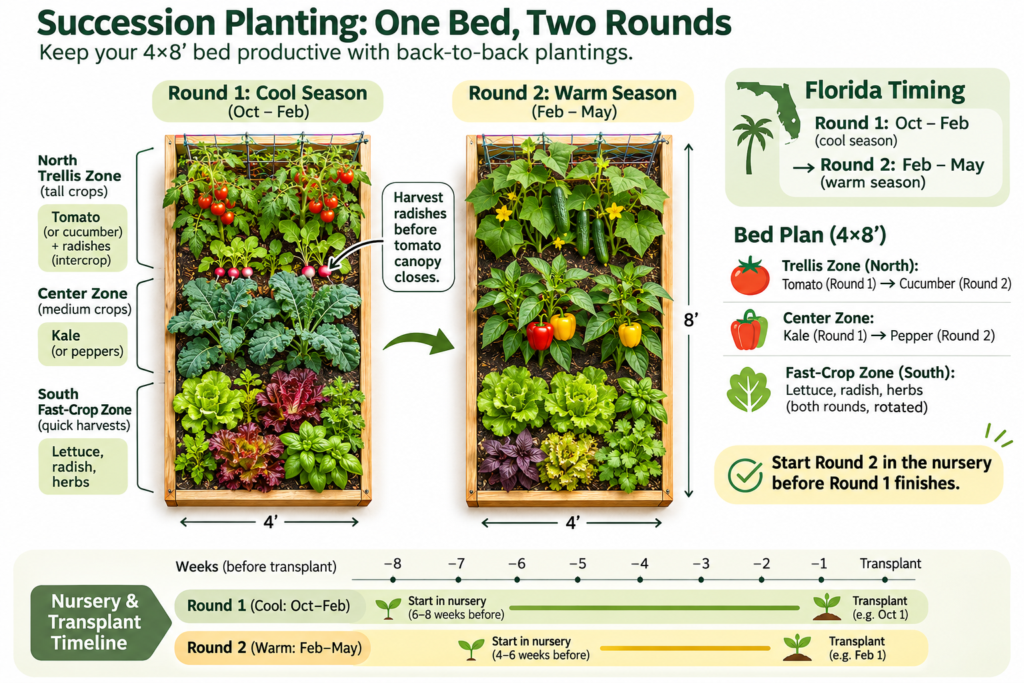
A 4×8’ bed planted once and harvested once is a garden. A 4×8’ bed planned in successions is a food system. The difference is not size, it’s timing. A farmer never leaves a bed empty. The moment one crop finishes, the next is already started in the nursery and ready to go in.
How to Plan Your Bed in Zones
A 4×8’ bed divides naturally into planting zones based on crop height, root depth, and sun relationship. Plan your zones before you plant your first crop.
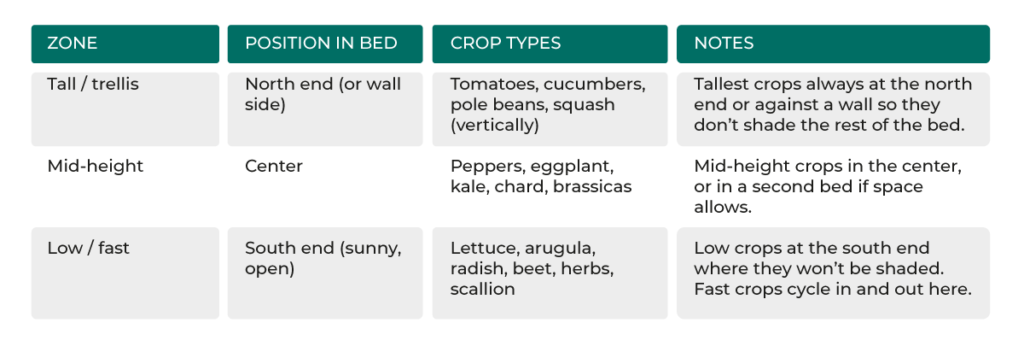
The Full Succession Calendar — 4×8’ Bed
This calendar is organized by national growing periods. Use the zone column to identify what fits your region’s current season. Florida-specific timing is called out at the bottom.
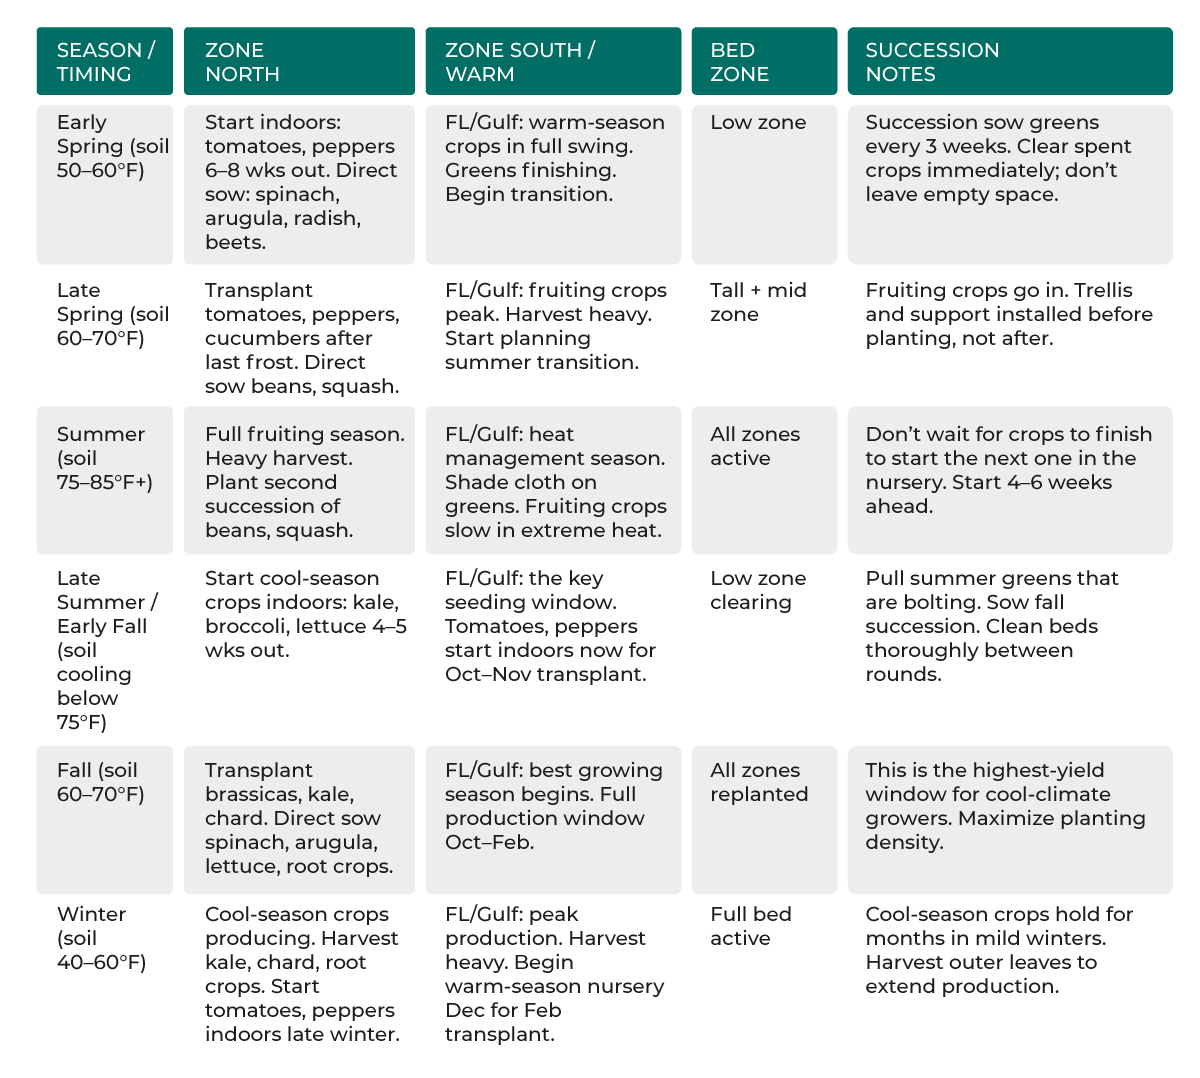
REGIONAL NOTE: Florida and Gulf Coast growers operate a nearly inverted calendar from the national norm. The productive cool season runs October through February. The challenge season is June through September. Plan your heavy plantings for the fall window, not spring. Starting tomatoes indoors in late August for October transplant is the equivalent of a northern grower’s March seed start.
The Succession Rule: Never Leave a Bed Empty
Every day a bed sits empty is a day of lost production. A farmer budgets nursery time into the crop plan so the next transplant is ready within 1–2 weeks of the last harvest. This is the habit that separates a producing bed from a hobby bed.
- When a crop is 2–3 weeks from finishing: start the replacement in the nursery.
- When a crop finishes: pull it the same day, amend the bed, and transplant or direct-sow within 48 hours.
- Intercropping: fast crops (radishes, scallions, lettuce) grow between slow crops (tomatoes, peppers) and finish before the canopy closes. This doubles the yield of the same space during the establishment phase.
SECTION 6
RAISED BED SLUMP — WHY BEDS FAIL IN YEAR TWO
Most backyard raised beds look great in year one. By year two they’re visibly smaller, drain worse, compact under foot traffic, and produce noticeably less. By year three, many are quietly abandoned. This is not bad luck, it’s a predictable sequence that has a predictable fix.
What Actually Happens
- Soil volume shrinks: organic matter decomposes and the soil level drops 2–4” in the first year. Without topdressing, the effective root volume shrinks every season.
- Fertility depletes: a productive bed removes nutrients every time you harvest. The soil is not a closed system, what leaves in the basket needs to come back as compost and organic inputs.
- Structure degrades: without regular organic matter additions, the fine particles left behind compact. Aeration decreases. Drainage slows. Roots struggle.
- Biology collapses: the microbial community that makes nutrients available to plants needs a continuous food source, organic matter. Starve it for a season and the living soil that made year one so productive becomes inert.
THE FARMER FRAMING: You are not feeding the plants. You are feeding the soil biology that feeds the plants. The moment you start thinking about soil as a living system rather than a growing medium, the annual refresh stops feeling like a chore and starts making sense as part of the production cycle.
The Annual Refresh — What to Add, How Much, and When
Do this once per year, at the beginning of each growing season. In warm climates with two seasons, do a lighter version between Round 1 and Round 2.
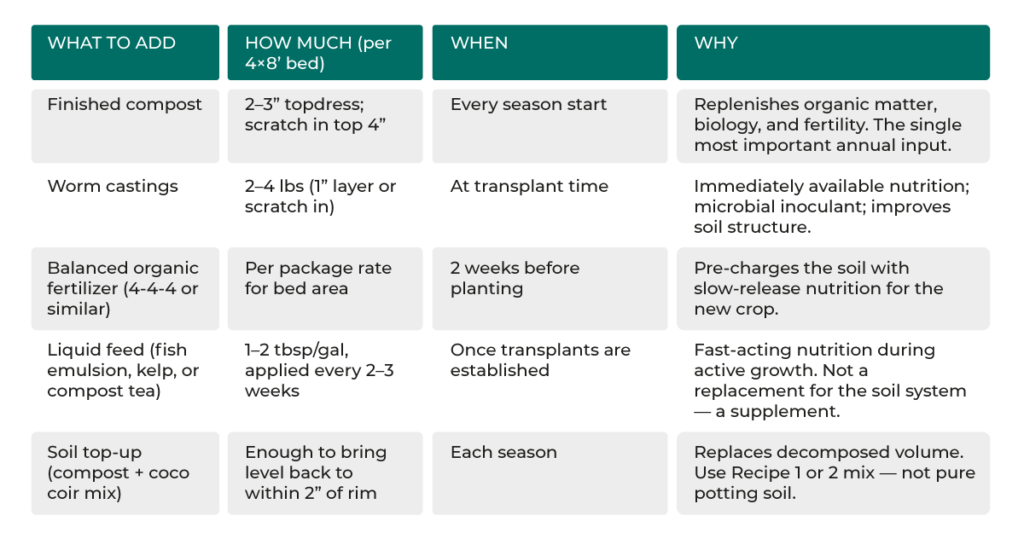
COMPOST IS NOT OPTIONAL: Every 4×8’ bed needs 2–3” of finished compost worked into the top layer at the start of each season. A 4×8’ × 2” application = approx. 5.3 cubic feet, or one standard 1.5 cu ft bag × 3–4 bags. Budget this as a fixed cost per season.
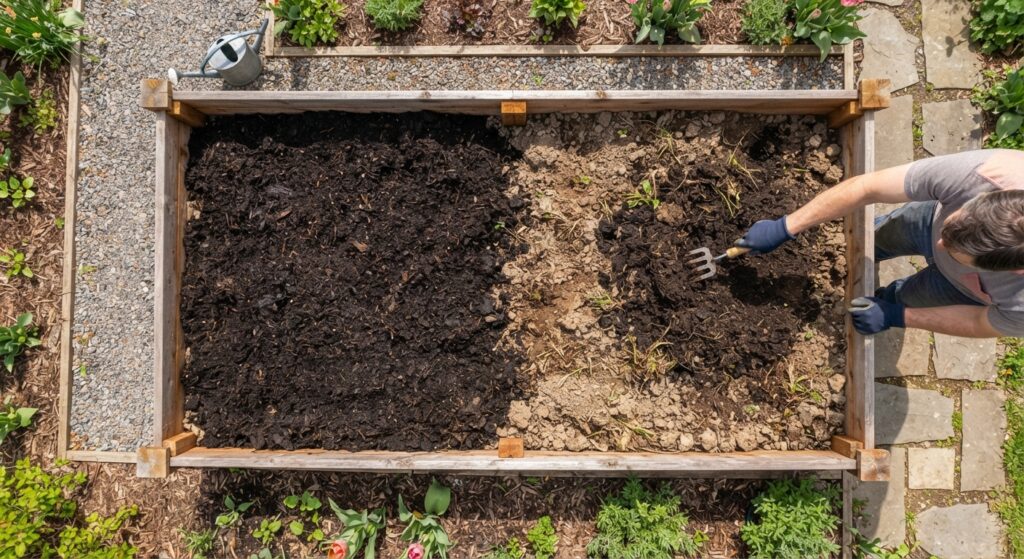
The Nitrogen Thief — What Steals From Your Bed
Not everything you add to a raised bed helps it. Some common practices actively reduce available fertility during the growing season.
SECTION 7
COMPOST COLLABORATION — THE NEIGHBORHOOD TIE-IN
A single household produces 200–400 lbs of compostable material per year — kitchen scraps, garden waste, cardboard. That’s enough compost to top-dress one 4×8’ bed, twice. Three households composting together produce enough for all three gardens, plus surplus.
The Three-Household Compost Model
- Each household maintains a compost system — a tumbler, a bin, or a simple pile. Kitchen scraps and dry carbon material (cardboard, shredded leaves) go in weekly.
- Every 8–12 weeks, finished compost is shared between the three households in proportion to what each contributed. No one household has to produce enough alone.
- Shared bulk purchase: ordering a cubic yard of finished compost from a local supplier splits to about $25–35 per household at three-way cost-sharing — the same volume would cost $80–100 per household in bagged product.
Sourcing Compost on a Budget
- Municipal composting programs: many cities offer free or heavily subsidized compost from yard waste facilities. Check your local solid waste authority.
- Local farms and stables: horse manure compost is often free for the hauling. Well-composted horse manure is an excellent soil amendment.
- Community garden compost: many community gardens maintain large compost systems and share finished product with participating households.
- Worm bins (vermicomposting): a 2×2×1’ worm bin produces 4–6 lbs of castings per month from kitchen scraps alone. No outdoor space required.
My bed build log
Bed size: ___________
Bed material: ___________
Soil recipe used: ___________
Drip system installed: ___________
First crop planted: ___________
My annual refresh log
Season / Year: ___________
Compost added: _____ cu ft
Worm castings added: ___________
Soil level topped to: ___________
First crop of new season: ___________
Get the full toolkit series + our farmer-curated Supply Guide at neighborhoodfarmsusa.org/knowledge-hub
NFUSA Field Guides help home growers grow like farmers, using simple systems that build food security, skills, and neighborhood connection.
This publication was produced by Neighborhood Farms USA, Inc. with funding provided in part by an appropriation from the State of Florida.
Join Our Newsletter
Stay informed on our progress and explore the latest insights, research, and real-world models shaping small-scale regenerative farming across the country.